
Showing posts with label Tutorial. Show all posts

Tuesday, May 10, 2016

DAUBER CASES & TEMPLATES UPDATED FOR 2016...

NEW Updated Dauber Cases Available
in Stampin' Up! & CTMH Colors


Dauber Cases and Templates have been updated with Stampin' Up!'s new 2016-2018 In Colors and Close to My Heart's 2015-2016 colors!

DAUBER CASES INCLUDE:
  • One Dauber Case /  Box -- see available case types below
  • Design top, as pictured, and label grid on the inside top and the individual labels on the inside bottom.  
  • Top grid covered by clear window sheet to prevent ink from getting on card stock.
  • 40 Sponge Daubers and the color labels for them (for you to attach).
  • Cost:  $60 plus shipping (unless local pickup)

TYPES OF CASES AVAILABLE:
STAMPIN' UP:
  • Core Colors.  These are available with grids in three different orders: 
    • ROYGBIV Order (rainbow)
    • Stampin' Up! Color Collection Order
    • Alphabetical Order
    • Plus versions of all three orders with Colored Top Grids (see example below)
  • In Colors, etc. (beginning with 2010-2012 colors through 2016-2018)
    • ROYGBIV Order
    • Alphabetical Order
    • Alphabetical Order with Shimmer Paints (LAST YEAR for Shimmer Paints)
    • Alphabetical Order with & without Shimmer Paints and Colored Top Grids
  • Retired Colors with 40 colors retired in June 2010 & 2013.
    • Alphabetical Order
    • Alphabetical Order with Colored Top Grids

CLOSE TO MY HEART:
  • Close To My Heart Color Palette updated with the Fall 2015 colors available in two orders: 
    • CTMH Color Colletions
    • Alphabetical Order
  • Close To My Heart Retired Colors (Alphabetical) 40 most recent from 2012, 2014, 2015
SHIPPING INFO:

Cost is $60.00 plus shipping ($6.80 for one case or $13.45 for two to six cases - recent increased shipping cost from USPS).  Insurance against loss or damage is optional, but recommended as the case is a tight fit and acrylic.  USPS is now including $50 insurance for free.  If you want the full cost of the product covered, the price is $2.65 for one case and $3.35 for two or more cases. 

The Dauber Cases are basically the cost of the items only with no charge for my time in assembling and processing them or PayPal fees.  The Sponge Daubers and cases have gone up significantly in cost.

NO EMPTY CASES WILL BE SOLD INDIVIDUALLY.

If you are interested in purchasing a Dauber Case, please email me with the following information:
  1. Type of case(s) you are interested in (including grid order selection)
  2. Whether you would like insurance against loss or damage or not
  3. Your PayPal email address
  4. Confirm that you are a US resident
I will then send you a PayPal invoice and upon payment order your sponge daubers.

*U.S. Residents only as Stampin' Up! does not permit shipping over international borders.

DAUBER CASE TEMPLATES

READ BEFORE PURCHASING:  All templates may be printed out for PERSONAL USE ONLY!  They may not be copied, shared with others (via link, file or print), rewritten, sold individually, gifted or put in dauber boxes for resale.  PLEASE respect my copyright on these templates and refer others to my website to purchase their own.  I feel I priced them very reasonably to allow others to purchase the template themselves.

STAMPIN' UP!
For those in Canada, etc. or demonstrators who already have their own case, you can purchase the templates for the Dauber Case inserts and the Dauber Labels.  The templates have been updated with the Stampin' Up! 2016-2018 In Colors as well as new Colored Top Grids.  Included are three documents: 
  • PDF with 18 pages of box templates - all the grids offered above plus the two styles of design tops (black & white and colored design at the left) and instructions.  
  • Dauber Current Color Labels (current, in colors and retired) that you can print on your own return address labels to apply to your daubers.  
  • Colored top grids (inside tops) are here!
All this for ONLY $5!  Click the PayPal link below to purchase your very own templates.


CLOSE TO MY HEART
The Close To My Heart Templates have been updated with Fall 2015 colors and include:
  • PDF (5 pages) with the 3 grids offered above for Dauber Cases plus the design tops and instructions.
  • PDF with Dauber Color Labels that you can print on your own return address labels to apply to your daubers.
All for ONLY $4!  Click the PayPal link below to purchase your very own templates.


Upon payment receipt, I will send you the files via email - usually within 24 hours.  If you have not received them after 48 hours or if you have any questions, please email me or give me a call as I may not have received the payment notification.  Thanks!

LOYALTY REWARDS - When you purchase $50 or more, you qualify for my Loyalty Rewards program!  This Frequent Stamper program is my way of saying "thank you" to my returning customers in appreciation of their business and is in addition to other Stampin' Rewards.  Earn FREE stamps with MarieStamps.com!

Monday, August 3, 2015

UPDATED DAUBER CASES & DAUBER CASE TEMPLATES...

NEW Updated Dauber Cases Available
in Stampin' Up! & CTMH Colors


Dauber Cases and Templates have been updated with new colors for both Stampin' Up! and Close to My Heart!

DAUBER CASES INCLUDE:
  • One Dauber Case /  Box -- see available case types below
  • Design top, as pictured, and label grid on the inside top and the individual labels on the inside bottom.  
  • Top grid covered by clear window sheet to prevent ink from getting on it.
  • 40 Sponge Daubers and the color labels for them (for you to attach).
  • Cost:  $60 plus shipping (unless local pickup)

TYPES OF CASES AVAILABLE:
STAMPIN' UP:
  • Core Colors.  These are available with grids in three different orders: 
    • ROYGBIV Order (rainbow)
    • Stampin' Up! Color Collection Order
    • Alphabetical Order
    • Plus versions of all three orders with Colored Top Grids (see example below)
  • In Colors, etc. (beginning with 2010-2012 colors through 2015-2017)
    • ROYGBIV Order
    • Alphabetical Order
    • Alphabetical Order with Shimmer Paints 
    • Alphabetical Order with & without Shimmer Paints and Colored Top Grids
  • Retired Colors with 40 colors retired in June 2010 & 2013.
    • Alphabetical Order
    • Alphabetical Order with Colored Top Grids

CLOSE TO MY HEART:
  • Close To My Heart Color Palette updated with 2015 colors available in two orders: 
    • CTMH Color Colletions
    • Alphabetical Order
  • Close To My Heart Retired Colors (Alphabetical) from 2012 and 2014
SHIPPING INFO:

Cost is $60.00 plus shipping ($5.50 for one case or $11.30 for two to six cases).  Insurance against loss or damage is optional, but recommended as the case is a tight fit and plastic.  USPS is now giving $50 insurance for free.  If you want the full cost of the product covered, you can pay as follows ($2.60 for one cases, $3.30 for two or three cases). 

The Dauber Cases are basically the cost of the items only with no charge for my time in assembling and processing them or PayPal fees.  The Sponge Daubers and cases have gone up significantly in cost.  NO EMPTY CASES WILL BE SOLD INDIVIDUALLY.

If you are interested in purchasing a Dauber Case, please email me with the following information:
  1. Type of case(s) you are interested in (including grid order selection)
  2. Whether you would like insurance against loss or damage or not
  3. Your PayPal email address
  4. Confirm that you are a US resident
I will then send you a PayPal invoice and upon payment order your sponge daubers.

*U.S. Residents only as Stampin' Up! does not permit shipping over international borders.

DAUBER CASE TEMPLATES

PLEASE NOTE:  All templates may be printed out for PERSONAL USE ONLY!  They may not be copied, shared with others (via link, file or print), rewritten, sold individually, gifted or put in dauber boxes for resale.  PLEASE respect my copyright on these templates and refer others to my website to purchase their own.  I feel I priced them very reasonably to allow others to purchase the template themselves.

STAMPIN' UP!
For those in Canada, etc. or demonstrators who already have their own case, you can purchase the templates for the Dauber Case inserts and the Dauber Labels.  The templates have been updated with the Stampin' Up! 2015-2017 In Colors as well as new Colored Top Grids.  Included are three documents: 
  • PDF with 18 pages of box templates - all the grids offered above plus the two styles of design tops and instructions.  
  • Dauber Current Color Labels (current, in colors and retired) that you can print on your own return address labels to apply to your daubers.  
  • NEW colored top grids are here!
All this for ONLY $5!  Click the PayPal link below to purchase your very own templates.


CLOSE TO MY HEART
The Close To My Heart Templates have been updated with 2015 colors and include:
  • PDF (5 pages) with the 3 grids offered above for Dauber Cases plus the design tops and instructions.
  • PDF with Dauber Color Labels that you can print on your own return address labels to apply to your daubers.
All this for ONLY $4!  Click the PayPal link below to purchase your very own templates.


Upon payment receipt, I will send you the files via email - usually within 24 hours.  If you have not received them after 48 hours or if you have any questions, please email me or give me a call as I may not have received the payment notification.  Thanks!
LOYALTY REWARDS - When you purchase $50 or more, you qualify for my Loyalty Rewards program!  This Frequent Stamper program is my way of saying "thank you" to my returning customers in appreciation of their business and is in addition to other Stampin' Rewards.  Earn FREE stamps with MarieStamps.com!

Wednesday, December 5, 2012

25 DAYS OF CHRISTMAS, DAY #15: Tea Bag Fold Christmas Tree Card...

Today's 25 Days of Christmas project is a CASE of previous Tea Bag Fold Tree cards (Scallop Christmas Tree Fold and Tea Bag Fold Tree) I have done with a little bit of a twist.  There are many different Tea Bag Fold variations.  This time I used one that is often used for origami layered stars, but I adapted it for a tree.  What I like about this one is that the front flap is one smooth piece instead of two flaps that some may have trouble getting to come together evenly.  Although I do still like the traditional one, too!  It also gives you a chance to see the Designer Series Paper better - which is a plus with this Be of Good Cheer DSP - the little red circles look like ornaments!

There is a FREE tutorial for the Tea Bag Fold Christmas Tree following the supply list.  Enjoy!


TEA BAG FOLD CHRISTMAS TREE SUPPLIES:
  • Stamp Sets – Mixed Medley (Hostess Only W#128054 $14, C#128057 $10)
  • Card Stock – Gumball Green, Cherry Cobbler, Early Espresso, Be of Good Cheer DSP, Champagne Glimmer Paper (#127885, $4.95)
  • Ink – Cherry Cobbler, Gumball Green, Champagne Mist Shimmer Paint (#116806, $5.95) for Champagne Shimmer Mist
  • Ribbon – Gumball Green 3/8" Stitched Satin (#126848, $8.95), Cherry Cobbler Baker's Twine (#123125, $2.95)
  • Punches – l-1/4" Scallop Circle (#127811, $15.95), 3/4" Circle (#119873, $12.95), Merry Minis Punch Pack (#126882, $16.95)
  • Tools – Big Shot, Petals-a-Plenty Embossing Folder (#116824, $7.95), Stampin' Dimensionals (#104430, $3.95) 
TEA BAG FOLD CHRISTMAS TREE DIRECTIONS:
  1. Cut four DSP squares measuring 3", 2-1/2", 2" and 1-1/2". 
  2. With right side down, fold paper diagonally corner to corner both ways unfolding after each fold.
  3. Then, fold in half both ways. Use a bone folder when folding for crisp creases. Unfold.  Your square should now look like diagram #1.
  4. Fold square in half as in diagram #2.  Grasp the left and right sides and push them down and inward toward the center.   When finished, your square will look like diagram #3 and when viewed from the top, it should resemble an "X".
  5. Pull the front left flap to the center as shown in diagram #4.
  6. Flatten the flap to form a kite shape as seen in diagram #5.  Be sure your bottom tip is directly under the peak of the triangle.  Flip over and repeat for the flap on the opposite side
  7. Repeat for all 4 squares. Adhere to your card beginning with the smallest.  Place the next tip inside the bottom of the previous one until all are done (diagram #6).  

LOYALTY REWARDS - When you purchase $50 or more, you qualify for my Loyalty Rewards program!  This Frequent Stamper program is my way of saying "thank you" to my returning customers in appreciation of their business and is in addition to other Stampin' Rewards.  Earn FREE stamps with MarieStamps.com!

Monday, December 3, 2012

25 DAYS OF CHRISTMAS, DAY #14: Purple Flurries Gift Card Holder...

Today's 25 Days of Christmas project is an oldie, but a goodie!  It is a gift card holder Jenni designed that she cased from another gift card holder she did a couple of years ago:  Ornamental Decoration.  There is a FREE mini tutorial following the supply list.

We used the Illuminate Glimmer Watermark Ink Pad from the Holiday Catalog for the watermarked images.  It is especially nice on dark colored card stock.  Since I used a light color, it doesn't show up very well in the photo, but it is a very pretty silvery, shimmery watermark.  And, yes, we used the Snow Flurry Die again!  What can I say?  I love it and it is not carrying over, so I have to use it all I can before the end of the month!  :o)  I colored the Rhinestone Jewels purple with a Sharpie.  Can't wait until I have the LARGE ones coming out in the Spring Catalog.  Those will be FABULOUS - you can never have enough bling!


Here it is opened up.  I left the gift card out of it, so that you could see the punch cut-outs.


PURPLE FLURRIES GIFT CARD HOLDER SUPPLIES:
  • Stamp Sets – Snowflake Soiree (W#127922 $29.95, C#127925, $21.95), Petite Pairs (W#122495 $28.95, C#122497 $20.95), No Peeking (W#126290 $24.95, C#126292 $17.95)
  • Card Stock – Wisteria Wonder, Perfect Plum
  • Ink – VersaMark, Illuminate Glimmer Watermark (#126857, $10.95)
  • Punches – Word Window (#119857, $15.95), 3/4" Circle (#119873, $12.95)
  • Accessories – Rhinestone Basic Jewels (#119246, $4.95),  White Stampin' Emboss Powder (#109132, $4.75)
  • Tools – Big Shot, Snow Flurry Die (#127813, $21.95), Sticky Strip (#104294, $6.95), Stampin' Dimensionals (#104430, $3.95) 
GIFT CARD HOLDER DIRECTIONS: 
  1. Cut card stock to  4 ¼” x 11”.
  2. With the card stock in the landscape position, score @ 3”, 5 ½” and 8”.
  3. Apply Sticky Strip to section #2 as shown above.
  4. Fold the card on the 5-1/2" score line.  Remove Sticky Strip liners and adhere sections #2 and 3 together to seal them shut.
  5. Use the Word Window Punch to punch the center flap twice side by side (about half of the Word Window opening should have card stock).
  6. In the center, punch again with the 3/4" Circle Punch (again about half way down).
  7. Cut 1" x 7-1/2" strip for the belly band.
  8. Fold the strip around the card and adhere to itself (not the card) placing the seam where it will be covered by your punch if it's big enough to be hidden.  If making snowflakes like we did, it will show, so put the seam on the back of the card.

LOYALTY REWARDS - When you purchase $50 or more, you qualify for my Loyalty Rewards program!  This Frequent Stamper program is my way of saying "thank you" to my returning customers in appreciation of their business and is in addition to other Stampin' Rewards.  Earn FREE stamps with MarieStamps.com!

Thursday, October 11, 2012

TECHNIQUE THURSDAY, Seamless Tiers / Triple Time With FREE Tutorial...

Today I have a card to share with you from my Beginner's Technique class last month.  It features the Rock & Roll technique which always amazes beginner stampers (and me, too!).  The French Foliage stamp set is PERFECT for this technique and is one of my favorite stamp sets to boot! 

This card also features the Seamless Tiers technique.  I first tried this technique back in May after getting an email newsletter with a card by Julia Stanton.  Since then I have seen many demonstrators calling it the Triple Time technique.  I call it Triple Layer Stamping.  Whatever name you choose, it is just a super fun technique!  I have included free instructions following the supply list, so you can try it out for yourself.


This another version I did using Cajun Craze for the mat colors.


FALL FOLIAGE TRIPLE CARD SUPPLIES:
  • Stamp Sets – French Foliage (W#120845 $19.95, C#121166 $14.95), Petite Pairs (W#122498 $28.95, C#122497 $20.95)
  • Card Stock – Very Vanilla, Soft Suede (or Cajun raze)
  • Ink – So Saffron, More Mustard, Old Olive, Cajun Craze, Cherry Cobbler & Soft Suede Classic, Cherry Cobbler, Pumpkin Pie & Soft Suede Stampin' Write Markers
  • Ribbon – Linen Thread (#104199, $4.50)
  • Punches – 3/4" Circle (#119873, $12.95), 1/16" Handheld Circle (#101227, $8.95)
  • Accessories – Naturals Designer Buttons (#127554, $4.95)
  • Tools – Color Spritzer Tool (#107066, $12.95), Stampin' Dimensionals (#104430, $3.95) 
TRIPLE TIME / SEAMLESS TIERS INSTRUCTIONS:

1.  Cut your card stock as follows:
    Very Vanilla Card Stock
  • 2" x 3-1/4" 
  • 3" x 4-1/4" 
  • 4" x 5-1/4" 
    Mat Card Stock (Soft Suede)
  • 2-1/4" x 3-1/2" 
  • 3-1/4" x 4-1/2" 
  • 5-1/2" x 8-1/2" (fold for card base)

2.  Using temporary adhesive (use a 2-Way Glue Pen or Multi Glue and allow to dry before continuing), stack the Very Vanilla card stock pieces on top of each other, centering each piece on top of the other:

3.  Stamp images all over the Very Vanilla card stock as if it were one solid piece instead of stacked layers.  In other words, the images should cross over the layers.  This is what results in the "Seamless Tiers".  WARNING:  You will see blank unstamped areas close to each tier.  This is normal!  You will not see these when the card is finished.

4.  Take the layers apart.  Adhere the largest stamped layer to the center of the card stock base.

5.  Adhere the middle sized stamp image to the middle mat.  Adhere the smallest stamped piece to the smallest mat.  Adhere the small matted piece on the middle piece.  This will cover up the unstamped edges.

6.  Add ribbon to these two layers if desired.

5.  Adhere this set of finished layers on top of the largest stamped piece.  Finish card as desired.

LOYALTY REWARDS - When you purchase $50 or more, you qualify for my Loyalty Rewards program!  This Frequent Stamper program is my way of saying "thank you" to my returning customers in appreciation of their business and is in addition to other Stampin' Rewards.  Earn FREE stamps with MarieStamps.com!

Tuesday, October 9, 2012

CLOCKWORKS NOTE CARDS FROM STAMPIN' UP! REGIONALS...

Still catching up on posts...  Today I have a note card set that was one of the Make & Takes from the Providence Regional Event.  Have you ever tried out our Note Cards & Envelopes?  You get 20 of these adorable note cards and envelopes for $5.95.  You can make 5 of these wonderful gift sets with each one.


The cards were very quick and easy to stamp, although I do recommend using a Stamp-a-ma-Jig for the clock faces.  I forgot to stamp the tag for the envelope at the event and I don't have the Clockworks stamp set yet, so I made my own with the Mixed Medley Hostess stamp set from the Holiday Mini Catalog.  There is a FREE mini tutorial for the envelope that all the note cards fit in at the end of the post as well as the directions for some common size envelopes.  Enjoy!


CLOCKWORKS NOTE CARDS SUPPLIES:
  • Stamp Sets – Clockworks (W#127290 $23.95, C#127292 $17.95), One in a Million (W#126380 $26.95, C#126382 $18.95), Mixed Medley (Hostess Only W#128054 $14, C#128057 $10)
  • Card Stock – Whisper White, Vellum, Whisper White Note Cards & Envelopes (#107322, $5.95)
  • Ink – Basic Gray, Calypso Coral, Gumball Green, More Mustard, Pool Party
  • Ribbon – Calypso Coral Baker's Twine (#125573, $2.95)
  • Punches – 1-1/4" Scallop Circle (#127811, $15.95), 3/4" Circle (#119873, $12.95), 1/16" Handheld Circle (#101227, $8.95)
  • Accessories – Brushed Bronze Designer Buttons (#127833, $6.95)
  • Tools – Simply Scored (#122334, $29.95), Simply Scored Diagonal Plate (#125586, $11.95), Stamp-a-ma-jig (#101049, $11.95), Stampin' Dimensionals (#104430, $3.95) 

ENVELOPE DIRECTIONS FOR NOTE CARDS HOLDER:
  1. Begin with a 7-¼" Square piece of Vellum card stock.
  2. With the Diagonal Plate in place on the Simply Scored Scoring Board, score two opposite sides of the square @ 2-7/8″. 
  3. Score the other two opposite sides @ 3-7/8″.
  4. Using a square punch, snip out the small triangular area where the score lines cross or intersect. 
  5. Fold on the score lines and crease firmly with your bone folder.  Fasten three sides together with snail adhesive, leaving the third side open.  You can trim the bottom flap before adhering if desired.
This envelope fits four cards and four envelopes perfectly.  If you would like to make an envelope to fit a single card, here are the measurements for a few of the most commonly used sizes:

Standard A2 Card (5-½” x 4-¼”) 
cut paper 7-¾” square
score two opposite sides @ 3-1/8”
score two opposite sides @ 4-1/8”

3” Square Card (Love Note)
cut paper 5” square
score all sides @ 2-3/8”

Open End Envelope (3½” x 6½”)
cut paper 7-¾” square
score two opposite sides @ 4-7/8”
score two opposite sides @ 2-½”
score again on one long side @ 5-1/8”

6” Square Card (or scrapbook page) 
cut paper 10” square
score all sides @ 4-5/8”

LOYALTY REWARDS - When you purchase $50 or more, you qualify for my Loyalty Rewards program!  This Frequent Stamper program is my way of saying "thank you" to my returning customers in appreciation of their business and is in addition to other Stampin' Rewards.  Earn FREE stamps with MarieStamps.com!

Monday, September 10, 2012

BABY BOY LANDON'S DIAPER CAKE WITH FULL TUTORIAL...

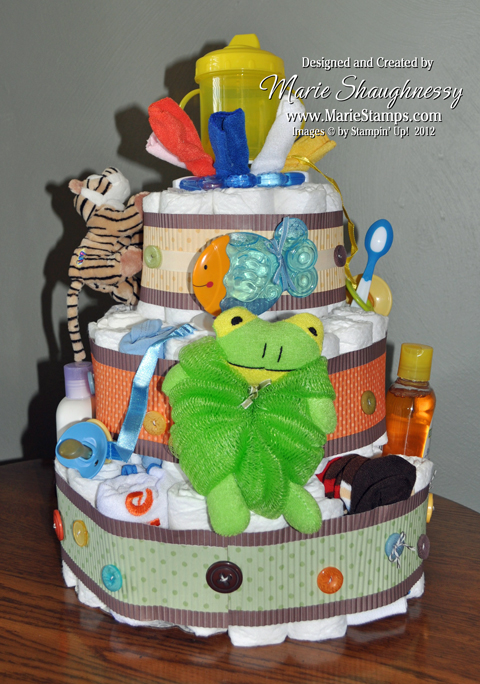
I have always wanted to make one of those cute diaper cakes you see at baby showers.  A friend's daughter is having her second baby boy, so it gave me the perfect opportunity to decorate a Diaper Cake for her shower yesterday.  I had to make a very simple version since I just got back from vacation and had another baby shower Saturday.  :(  Next time I will have to dress it up more!  This time I had to let the baby items serve as most of the "decoration".  The theme for the shower was jungle animals with the colors that I used polka dotted on a chocolate background.  A FREE tutorial for making the base diaper cake follows the supply list.

Baby Landon is due to make his appearance soon (not soon enough for his mommy)!   His big brother Logan is the one I made the nursery letters for a couple of years ago.  He liked the cake so much that he ate the "a" in Landon right off the cake!  I hope you enjoy the diaper cake as well - but not that much!  :o)


Here is the back of the diaper cake:


BABY BOY LANDON'S DIAPER CAKE SUPPLIES:
  • Card Stock – Bashful Blue, Chocolate Chip, Designer Series Paper Patterns Stack
  • Ribbon – Early Espresso Baker's Twine (#123124, $2.95), Whisper White Baker's Twine (#123262, $2.95)
  • Accessories – Brights Designer Buttons (#119747, $8.95), Neutrals Designer Buttons (#119743, $8.95), Subtles Designer Buttons (#119745, $8.95)
  • Tools – Big Shot, Perfect Polka Dots Embossing Folder (#117335, $7.95), Alphabet Simple Letters Dies (retired - can use Typeset Alphabet Dies), Crimper, Mini Glue Dots (#103683, $4.95), Big Shot Multi-purpose Adhesive Sheets (#120805, $14.95)
  • Misc – 12" - 14" Cardboard Cake Base, Baby Powder, Baby Bottle, miscellaneous baby items for decorating the cake
DIAPER CAKE TUTORIAL:
For my diaper cake, I used Pampers Sensitive Swaddlers, Size 2.  The amount of diapers you will use for each ring and layer will depend on the brand and size of diapers, as well as how tightly you roll them.  Don't worry if you need more or less diapers than I used.  After making the cake, I slide out some of the diapers and replace a few of them with rolled up bibs, onsies, socks, etc.

1. Adhere Big Shot Multi-Purpose Adhesive Sheets to the bottom of a Baby Powder container and cut around it tightly.  Peel off the paper backing, and adhere the Baby Powder on the middle of the Cake Base.

2.  Roll up approximately 9 diapers.  To roll, place the diaper flat down on the table with the printed band facing up.  As pictured, I began with "top" of the diaper close to me and rolled toward the crotch of the diaper.  You could choose to do it the opposite direction as well, but you will have to be careful and the diapers get "off" more easily in this direction.  Try to roll them pretty tightly.  Wrap a smaller rubber band around the middle of the diaper.  However, you don't want to make the rubber band so tight that it puckers.  The Swaddlers have a light yellow "line" up the middle of the outside of the diaper, which makes it easy to center the rubber band which is important later.  You may want to roll all your diapers now, so that you will not have to stop and roll for each cake layer.

3.  Stand the diapers up around the Baby Powder.  It may take more or less than the 9 diapers depending on what type and size of powder and/or diapers you have.  Wrap a larger rubber band around this ring, so that it hugs the powder as shown.

4.  Roll approximately 14 more diapers.  Stand the diapers up to form a second ring around the first ring. Wrap a larger rubber band around this second ring.  Secure the entire ring with a rubber band, making sure it does not pucker them.  It will help it stand up straighter.

5. Roll approximately 20 more diapers.  Stand the diapers up to form a third ring around the second ring. Wrap a large rubber band around this third ring or tie with Baker's Twine if you do not have a large enough rubber band.  Remember that you don't want it to pucker much.  This last ring should be hitting the outer edge of the cake base or even covering it if using a 12" cake base.  Wrap with an additional rubber band or Baker's Twine for more security.  Be sure all the bands are aligned in the center of the diapers as this is your outer ring, so you want it to be neat.

6.  Adhere a bunch of Mini Glue Dots along the edge of the bottom of an inexpensive 4 oz. Baby Bottle.  Adhere the Baby Bottle to the top of the Baby Powder as pictured.

7.  Roll approximately 9 more diapers. Stand the diapers up around the Baby Powder & Baby Bottle on top of the first layer.  This will be the first ring of your second layer.  Wrap a larger rubber band around this ring, so that it hugs the powder/bottle as shown.


8.  Roll approximately 14 more diapers.  Stand the diapers up to form a second ring around the first ring of the second layer. Wrap a larger rubber band around this second ring.  Secure the entire ring with a rubber band, making sure it does not pucker them.  Again, be sure all the rubber bands are aligned in the center as this is your outer ring of the second layer.

9.  Roll approximately 7 more diapers.  Stand the diapers up around the top of the Baby Bottle on top of the second layer.  Wrap a rubber band around the last ring to form the third and top layer of the cake.  The diapers will be a little taller than the Bottle.  

10.  Add a cute topper like a stuffed animal or baby toy and decorate your "cake" as pictured at the top of the post.

LOYALTY REWARDS - When you purchase $50 or more, you qualify for my Loyalty Rewards program!  This Frequent Stamper program is my way of saying "thank you" to my returning customers in appreciation of their business.  Earn FREE stamps with MarieStamps.com!
STAMPIN' REWARDS -  Anytime you place a product order with me of $150 or more, you earn your choice of FREE Stampin' Up! products including hostess stamp sets. Check out my Stampin' Rewards page for full information on these two programs.

Related Posts with Thumbnails