Showing posts with label 3D. Show all posts

Saturday, December 15, 2012

25 DAYS OF CHRISTMAS, DAY #24: Snowman, Santa & Rudolph Tea Light Candles...

Today's 25 Days of Christmas project is three for one - three adorable battery operated tealight candles!  I have been seeing the snowmen ones everywhere and decided I needed to make one.  But, he was lonely, so I made him a couple of friends - Santa and Rudolph.  Aren't they cute?


The snowmen I have seen all had a cute little "knit" cap, but I decided to go more traditional for my Frosty with a top hat instead.  I also chose a Scalloped Tulle scarf instead of Sweater Trim.  Both are cute though!  I colored his nose orange with a Sharpie marker.  Here's a closeup:


FROSTY THE SNOWMAN TEA LIGHT SUPPLIES:
  • Card Stock – Whisper White, Basic Black, Silver Glimmer Paper (#121790, $4.95), Red Glimmer Paper (#121790, $4.95)
  • Ink – Pink Pirouette, Pool Party Classic
  • Ribbon – Cherry Cobbler Scalloped Tulle (#127841, $6.95)
  • Punches – 2-1/2" Circle (#120906, $16.95), l-3/8" Circle (#119860, $15.95), Extra-Large Oval (#119859, $16.95), Itty Bitty Shapes Punch Pack (#118309, $16.95), Owl Builder (#118074, $16.95),  Word Window (#119857, $15.95)
  • Accessories – Pearl Basic Jewels (#119247, $4.95), Rhinestone Basic Jewels (#119246, $4.95), Battery operated tea light candles, Sharpie marker
  • Tools – Big Shot, Snow Flurry Die (#127813, $21.95), Circles #2 Die (#114526, $15.95), Sticky Strip (#104294, $6.95), Mini Glue Dots
I'm still not sure about the Santa Tea Light.  I may change his hat later, but it will do for now.  To get the color of his nose light enough, I colored it and then wiped it off right away leaving a light staining of peach.  Here is a closeup of Santa:


SANTA TEA LIGHT SUPPLIES:
  • Card Stock – Whisper White, Real Red, Pacific Point, Blushing Bride (retired)
  • Punches – 1-3/4 Scallop Circle (#119854, $16.95), l-1/4" Scallop Circle (#127811, $15.95), l-3/8" Circle (#119860, $15.95), Scallop Oval, #119856, $16.95), Extra-Large Oval (#119859, $16.95), Curly Label (#119851, $16.95), Itty Bitty Shapes Punch Pack (#118309, $16.95), Owl Builder (#118074, $16.95)
  • Accessories – Battery operated tea light candles, Sharpie marker
  • Tools – Big Shot, Snow Flurry Die (#127813, $21.95), Sticky Strip (#104294, $6.95), Mini Glue Dots
I kept Rudolph pretty simple.  After coloring his nose with a Sharpie, I painted a thin coat of the Cherry Cobbler Dazzling Details.    Here is a closeup of Rudolph:


RUDOLPH THE REINDEER TEA LIGHT SUPPLIES:
  • Card Stock – Chocolate Chip, Crumb Cake, More Mustard, Whisper White, Basic Black, Red Glimmer Paper (#121790, $4.95)
  • Punches – 1-3/4 Scallop Circle (#119854, $16.95), Small Oval (#120908, $12.95), Itty Bitty Shapes Punch Pack (#118309, $16.95), Merry Minis Punch Pack (#126882, $16.95), Owl Builder (#118074, $16.95)
  • Accessories – Cherry Cobbler Dazzling Details (#125585, $2.50), White Signo Gel Pen (#105021, $3.95), Battery operated tea light candles, Sharpie marker
  • Tools – Big Shot, Snow Flurry Die (#127813, $21.95), Sticky Strip (#104294, $6.95), Mini Glue Dots
Please Note:  For the top of the tealight for each one, first punch a hole with the circle punch from the Itty Bitty Shapes Punch Pack.  Then center this hole in the window of the 1-3/8" Circle Punch and punch.  This will allow you to slide the card stock down over the light/nose.  You will also need to punch a hole in the base (underneath the candle) where the switch is for the light.

Coloring the nose is more for what the tealights look like when they are not lit.  When they are lit, they all look like different shades of yellow - the coloring does not affect it much.

LOYALTY REWARDS - When you purchase $50 or more, you qualify for my Loyalty Rewards program!  This Frequent Stamper program is my way of saying "thank you" to my returning customers in appreciation of their business and is in addition to other Stampin' Rewards.  Earn FREE stamps with MarieStamps.com!

Thursday, December 13, 2012

25 DAYS OF CHRISTMAS, DAY #23: Keepsake Holiday Ornament...

Today's 25 Days of Christmas project is my version of the ornament on the front of the ornament on the front cover of the Holiday Catalog.

This was one of the projects we made at my Holly Jolly Stamp Camp a few weeks ago.   Since it was only one of many projects we would be doing,  I didn't want to take up too much time with stamping all the images and cutting them out, so I chose to just use Designer Series Paper and Glimmer Paper.  I used the Natural Composition Specialty DSP and brayed Cherry Cobbler onto it.  I love this paper as it is embossed, so the ink will not stick to the embossed designs.  Just use a paper towel to buff the ink off and you have your own custom colored DSP!


Since I made two of these (one as a sample and one during class), I decided to hot glue the ornaments together to have a full 2-sided ornament.  Yes, the two were made with different patterns, but you really only see one side at a time and the colors match, so it works for me.  Here is a side view of the ornament.


Update:  I have gotten several inquires for a tutorial for the ornament.  Since this was a paid class project, I am not sharing the directions for the ornament on my blog.  However, if you purchase the Holiday Ornaments Framelits and/or the Keepsake Ornament Stamp Set or bundle through me, just email me and I will send you a PDF with the instructions.

KEEPSAKE ORNAMENT SUPPLIES:
  • Card Stock – Natural Composition Specialty DSP (#126917, $12.95), Champagne Glimmer Paper (#127885, $4.95)
  • Ink – Cherry Cobbler
  • Ribbon – Crumb Cake 3-1/2" Scalloped Tulle (#127840, $6.95), Linen Thread (#104195, $4.50)
  • Accessories – Brushed Bronze Designer Buttons (#127833, $6.95), Antique Brads (#117273, $5.95)
  • Tools – Big Shot, Holiday Ornaments Framelits (#127816, $24.95 or purchase in bundle with Ornament Keepsakes stamp set), Designer Rosette Die (#125594, $42.95), Stampin' Dimensionals (#104430, $3.95), Brayer (#102395, $12.50), Silicone Craft Sheet (#127853, $5.95), Hot Glue Gun
LOYALTY REWARDS - When you purchase $50 or more, you qualify for my Loyalty Rewards program!  This Frequent Stamper program is my way of saying "thank you" to my returning customers in appreciation of their business and is in addition to other Stampin' Rewards.  Earn FREE stamps with MarieStamps.com!

Friday, December 7, 2012

25 DAYS OF CHRISTMAS, DAY #17: Rudolph the Reindeer Fancy Favor Box...

Today's 25 Days of Christmas project is a Rudolph the Red-Nosed Reindeer Box.  I decided that Frosty needed a friend for the holiday season!  I love using the Fancy Favor Die for boxes, because it makes it so quick and easy.  Read on for how I made the antlers...

This photo is a bit blurry, but I wanted to show the depth created by using Stampin' Dimensionals on some of the features as well as the ribbon handle.


Ever since some of my favorite Big Shot dies that were perfect for antlers retired, I've been trying to figure out what to use.  I've tried a few things, but wasn't really happy with any of them.  Then the new Autumn Accents Die came out and I thought that the Oak Leaf from that might be good.  However, it still looked like... well, like an oak leaf!

So I tried off cutting out the leaf, and then recut it again by off-setting it in one direction (photo #1) and then the other (photo #2).  These antlers were definitely better (photo #3).  However the antler structure just wasn't open enough for me.


So I decided to try opening the structure up by using the Word Window Punch to punch into the open space between each "branch" of the leaf as shown at the left.  Sometimes it required more than one punch - punching again just a little bit to one side or the other.  I ended up liking this version best, but I may tweak it again in the future! 

RUDOLPH THE REINDEER FANCY FAVOR BOX SUPPLIES:
  • Card Stock – Chocolate Chip, Crumb Cake, More Mustard, Red Glimmer Paper (#121790, $4.95)
  • Ink – More Mustard, Chocolate Chip Classic, Chocolate Chip Marker
  • Ribbon – Chocolate Chip 1/2" Scallop Dots (#124142, $7.95)
  • Punches – Word Window (#119857, $15.95), 1-3/4" Scallop Circle (#119854, $16.95), 1" Circle (#119868, $12.95), 3/4" Circle (#119873, $12.95), Blossom Petals Builder (#121808, $16.95), Owl Builder (#118074, $16.95)
  • Accessories – l (#119859, $16.95)
  • Tools – Big Shot, Fancy Favor Die (#115965, $39.95), Autumn Accents Die (#127812, $21.95),  Stampin' Dimensionals (#104430, $3.95), Stampin' Sponges
LOYALTY REWARDS - When you purchase $50 or more, you qualify for my Loyalty Rewards program!  This Frequent Stamper program is my way of saying "thank you" to my returning customers in appreciation of their business and is in addition to other Stampin' Rewards.  Earn FREE stamps with MarieStamps.com!

Sunday, December 2, 2012

25 DAYS OF CHRISTMAS, DAY #13: Frosty the Snowman Fancy Favor Box...

Today's 25 Days of Christmas project is a simple 3D Snowman Box made with the Fancy Favor Die.  It's the perfect quick wrapping for small holiday gifts - especially with some cute stamped tissue paper. 

I couldn't decide what to make the scarf with, so I made two versions.  The Sweater Trim from the Holiday Catalog is already knitted, so by braiding three strands of it together, it really looks like a knitted scarf.  You could just twist the ends around the scarf (like I did with the front of the tulle scarf in the second photo) instead of leaving them loose if you prefer a more compact look.  I kind of liked the trailing ends.


This first version of the Snowman box was made with the Scalloped Tulle as the scarf and I hadn't decided on the Scallop Dots Ribbon for the handle/ear muffs yet. 


FROSTY FANCY FAVOR BOX SUPPLIES:
  • Card Stock – Whisper White, Basic Black, Pumpkin Pie, Red Glimmer Paper (#121790, $4.95)
  • Ink –  Pink Pirouette, Tangerine Tango Classic & Marker
  • Ribbon – 1/2" Scallop Dots (#124145, $7.95), Cherry Cobbler 1/4" Sweater Trim (#129938, $8.95), 3-1/2" Scalloped Tulle Ribbon (#127841, $6.95)
  • Punches – 1-3/4" Scallop Circle (#119854, $16.95), 3/4" Circle (#119873, $12.95), Blossom Petals Builder (#121808, $16.95), Owl Builder (#118074, $16.95)
  • Tools – Big Shot, Fancy Favor Die (#115965, $39.95), Stampin' Dimensionals (#104430, $3.95), Sponge Daubers
LOYALTY REWARDS - When you purchase $50 or more, you qualify for my Loyalty Rewards program!  This Frequent Stamper program is my way of saying "thank you" to my returning customers in appreciation of their business and is in addition to other Stampin' Rewards.  Earn FREE stamps with MarieStamps.com!

Monday, September 10, 2012

BABY BOY LANDON'S DIAPER CAKE WITH FULL TUTORIAL...

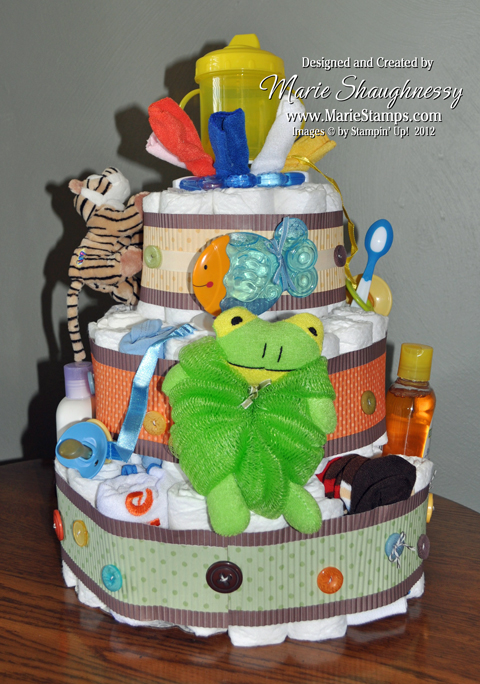
I have always wanted to make one of those cute diaper cakes you see at baby showers.  A friend's daughter is having her second baby boy, so it gave me the perfect opportunity to decorate a Diaper Cake for her shower yesterday.  I had to make a very simple version since I just got back from vacation and had another baby shower Saturday.  :(  Next time I will have to dress it up more!  This time I had to let the baby items serve as most of the "decoration".  The theme for the shower was jungle animals with the colors that I used polka dotted on a chocolate background.  A FREE tutorial for making the base diaper cake follows the supply list.

Baby Landon is due to make his appearance soon (not soon enough for his mommy)!   His big brother Logan is the one I made the nursery letters for a couple of years ago.  He liked the cake so much that he ate the "a" in Landon right off the cake!  I hope you enjoy the diaper cake as well - but not that much!  :o)


Here is the back of the diaper cake:


BABY BOY LANDON'S DIAPER CAKE SUPPLIES:
  • Card Stock – Bashful Blue, Chocolate Chip, Designer Series Paper Patterns Stack
  • Ribbon – Early Espresso Baker's Twine (#123124, $2.95), Whisper White Baker's Twine (#123262, $2.95)
  • Accessories – Brights Designer Buttons (#119747, $8.95), Neutrals Designer Buttons (#119743, $8.95), Subtles Designer Buttons (#119745, $8.95)
  • Tools – Big Shot, Perfect Polka Dots Embossing Folder (#117335, $7.95), Alphabet Simple Letters Dies (retired - can use Typeset Alphabet Dies), Crimper, Mini Glue Dots (#103683, $4.95), Big Shot Multi-purpose Adhesive Sheets (#120805, $14.95)
  • Misc – 12" - 14" Cardboard Cake Base, Baby Powder, Baby Bottle, miscellaneous baby items for decorating the cake
DIAPER CAKE TUTORIAL:
For my diaper cake, I used Pampers Sensitive Swaddlers, Size 2.  The amount of diapers you will use for each ring and layer will depend on the brand and size of diapers, as well as how tightly you roll them.  Don't worry if you need more or less diapers than I used.  After making the cake, I slide out some of the diapers and replace a few of them with rolled up bibs, onsies, socks, etc.

1. Adhere Big Shot Multi-Purpose Adhesive Sheets to the bottom of a Baby Powder container and cut around it tightly.  Peel off the paper backing, and adhere the Baby Powder on the middle of the Cake Base.

2.  Roll up approximately 9 diapers.  To roll, place the diaper flat down on the table with the printed band facing up.  As pictured, I began with "top" of the diaper close to me and rolled toward the crotch of the diaper.  You could choose to do it the opposite direction as well, but you will have to be careful and the diapers get "off" more easily in this direction.  Try to roll them pretty tightly.  Wrap a smaller rubber band around the middle of the diaper.  However, you don't want to make the rubber band so tight that it puckers.  The Swaddlers have a light yellow "line" up the middle of the outside of the diaper, which makes it easy to center the rubber band which is important later.  You may want to roll all your diapers now, so that you will not have to stop and roll for each cake layer.

3.  Stand the diapers up around the Baby Powder.  It may take more or less than the 9 diapers depending on what type and size of powder and/or diapers you have.  Wrap a larger rubber band around this ring, so that it hugs the powder as shown.

4.  Roll approximately 14 more diapers.  Stand the diapers up to form a second ring around the first ring. Wrap a larger rubber band around this second ring.  Secure the entire ring with a rubber band, making sure it does not pucker them.  It will help it stand up straighter.

5. Roll approximately 20 more diapers.  Stand the diapers up to form a third ring around the second ring. Wrap a large rubber band around this third ring or tie with Baker's Twine if you do not have a large enough rubber band.  Remember that you don't want it to pucker much.  This last ring should be hitting the outer edge of the cake base or even covering it if using a 12" cake base.  Wrap with an additional rubber band or Baker's Twine for more security.  Be sure all the bands are aligned in the center of the diapers as this is your outer ring, so you want it to be neat.

6.  Adhere a bunch of Mini Glue Dots along the edge of the bottom of an inexpensive 4 oz. Baby Bottle.  Adhere the Baby Bottle to the top of the Baby Powder as pictured.

7.  Roll approximately 9 more diapers. Stand the diapers up around the Baby Powder & Baby Bottle on top of the first layer.  This will be the first ring of your second layer.  Wrap a larger rubber band around this ring, so that it hugs the powder/bottle as shown.


8.  Roll approximately 14 more diapers.  Stand the diapers up to form a second ring around the first ring of the second layer. Wrap a larger rubber band around this second ring.  Secure the entire ring with a rubber band, making sure it does not pucker them.  Again, be sure all the rubber bands are aligned in the center as this is your outer ring of the second layer.

9.  Roll approximately 7 more diapers.  Stand the diapers up around the top of the Baby Bottle on top of the second layer.  Wrap a rubber band around the last ring to form the third and top layer of the cake.  The diapers will be a little taller than the Bottle.  

10.  Add a cute topper like a stuffed animal or baby toy and decorate your "cake" as pictured at the top of the post.

LOYALTY REWARDS - When you purchase $50 or more, you qualify for my Loyalty Rewards program!  This Frequent Stamper program is my way of saying "thank you" to my returning customers in appreciation of their business.  Earn FREE stamps with MarieStamps.com!
STAMPIN' REWARDS -  Anytime you place a product order with me of $150 or more, you earn your choice of FREE Stampin' Up! products including hostess stamp sets. Check out my Stampin' Rewards page for full information on these two programs.

Thursday, May 17, 2012

GARDEN PARTY PETITE PURSES: Tips on Keeping the Pattern Straight with the Petite Purse Die...

Tomorrow night it is my turn to host my monthly Bunco group.  I always make little favors for everyone to go home with.  This year my theme is a Garden Tea Party, so I decided that the adorable purses made with the Petite Purse Die were just the the thing!   Two Ghiradelli Chocolate Squares will fit perfectly inside the purses.  Unfortunately I didn't check the pictures I took and they are a little fuzzy.  So there are two photos, one with the front four purses in focus and one with the back purses in focus.  Sorry about that!


I used the Dotted Scallop Ribbon Border Punch for the base under the purse handle for added strength and a lacy touch.  Most of the brads I used are retiring on May 31.  They are available while supplies last only and many of them are on sale!  

The cutting pattern for the purse is tipped at an angle on the die.  That is not a problem when cutting solid colored card stock.  However, when using Designer Series Papers with patterns that are not random, if you place the DSP straight on the die, your purse pattern will look crooked once it is assembled. 

How can you cut the paper so that the pattern will be straight?
Try this tip for placing DSP on the die, so that your purse pattern will be straight.  Be sure to bookmark this post, so that you can use it once you can order these dies again on June 1.

  1. Place a strip of masking tape on your die that is parallel with the straight part of the bottom of of the die cut and about 1/2" away from it.  This will allow the paper to completely cover the cutting area of the die.  Use a ruler to be sure it is perfectly aligned.  Please note:  I allow for a very narrow margin in covering the cutting area on my die.  The measurements given are a bit more than you see on my die.   You may be more comfortable with an even more generous allowance. 

  2. Place another strip of masking tape perpendicular to the purse bottom.  I used a square to determine the angle.  Be sure to allow for enough space that the paper will completely cover the cutting area.  

  3. You can place another strip of masking tape on the left side perpendicular to the purse bottom, if desired.  After you have placed all masking tape, you can trim the outside edges until even with the edge of the foam as I did.

  4. Cut a piece of DSP to 5-3/4" x 8".  Place the DSP so that it just meets up with the bottom and right pieces of masking tape and cut.

GARDEN PARTY PETITE PURSES SUPPLIES:
  • Card Stock – Melon Mambo, Pumplin Pie, Paisley Petals DSP, Flirtatious Specialty DSP (retiring)
  • Accessories – Clear Rhinestone Brads (#113144, $8.21 on sale-retiring), Ice Circle Rhinestone Brads (#109111, $8.21 on sale-retiring), Flower Designer Brads (#112579, $5.95 retiring), Filigree Designer Brads (#112577, $3.57 on sale-retiring), Neutrals 5/8" Brads (#112533, $4.17 on sale-retiring), Basic Pearl Jewels (#119247, $4.95), Large Pearl Basic Jewels (#125577, $4.95)
  • Punches – Dotted Scallop Ribbon Border (#119275, $15.95)
  • Tools – Big Shot, Petite Purse Die (#125606 , $32.95 beginning June 1)

LOYALTY REWARDS - When you purchase $50 or more, you qualify for my Loyalty Rewards program!  This Frequent Stamper program is my way of saying "thank you" to my returning customers in appreciation of their business and is in addition to other Stampin' Rewards.  Earn FREE stamps with MarieStamps.com!

Related Posts with Thumbnails