
Showing posts with label Wheels. Show all posts

Tuesday, September 27, 2011

TOOL TIP TUESDAY, Unmounting Your Stampin' Around Wheels Video...

For today's Tool Tip, I wanted to feature our Stampin' Up! Wheels and to show you an "out of the box" way to use them.

I love our wheels!  They are a fun and easy tool to use.  I use the "free-flowing", open styles to wheel on wrapping paper, labels, gift bags & boxes, scrapbook pages, etc.  The new Builder Wheels really take the fun up a few notches.  You can stack up to three different builder wheels on a spindle that snaps into a Jumbo Stampin' Around Handle.  Add a Triple-Cell Ink Cartridge and you can be rolling all three wheels in DIFFERENT COLORS to produce your own custom multicolored designs!  Woot!

However, if the wheel is a scene (like the retired Haunting) or words and phrases intermixed (like Bright Blessings or I {Love} Love), or just something I would like to hand-color with markers, then I unmount the rubber from the wheel and use it as a regular stamp.  You can unmount them to use as one stamp and marker the areas you'd like to stamp or cut the stamp up into individual stamps and have a whole set of stamps for only $8.50!  It makes them so much easier to work with and if you have been wheel-challenged up to now, you will find yourself loving your wheels!  See my video at the end of this post on how to unmount your wheels! 

Standard Wheels
Jumbo Wheels
Builder Wheels


Stampin' Around Wheels, Handles and Accessories

WHEELS
•  Available in Standard, Jumbo, and Builder sizes.
•  Same deeply etched images in high-quality rubber as our regular stamps.
•  Use with Stampin’ Around handles, Spindles/Spacers and ink cartridges (sold separately)
•  Excellent to stamp labels for nuggets, party bags, gift boxes & wrap, and scrapbook pages quickly.

HANDLES
•  Easy to switch cartridges and wheels, so you only need one of each sized handle - Standard and Jumbo.
•  Ergonomic design
•  Durable plastic construction
•  Available in Standard and Jumbo sizes

SPINDLES & SPACERS
•  Use with Builder Wheels
•  Spindle holds up to 3 Builder Wheels and fits Stampin’ Around Jumbo Handle
•  Spindle comes with end cap piece to hold it securely in handle
•  Spindle comes with 2 spacers
•  Use spacers to substitute for a wheel when only using 1 or 2 Builder Wheels.   When using only 1 or 2 Builder wheels, make sure you apply pressure firmly and evenly so the wheel doesn't rock.

WHEEL GUIDE
•  Works with Stampin’ Around wheels to create straight lines of wheeled art.  No more crooked Stampin’ Around Wheel images!
•  Two 12" rulers snap together to make a 22" straight edge or a right angle corner while the clear plastic allows you to see your artwork as you wheel.

HOW TO UNMOUNT YOUR STAMPIN' UP! WHEELS:


If you received this post via email or a feed, the video will not be visible.  Please click the post title at the top of the email to be taken directly to my blog post where you will be able to view the video.

TOOLS TO UNMOUNT YOUR WHEELS:
  • Craft & Rubber Scissors (#103179, $19.95)
  • Clear-Mount Cling Foam (#124236, $10.95/2)
  • Hobby Knife or Xacto knife

Monday, September 27, 2010

SPOOKY STAMP CAMP, A Hauntin' We Will Go Milk Carton

Here is the third project from my Spooky Stamp Camp.  This little treat is made using our adorable Mini Milk Carton Die.  It gave everyone a chance to exercise their braying skills which they love having the chance to do.  Can you believe this started as just a plain white piece of card stock?  Braying is just so cool to do!  And the results are always stunning.

I also selected this project for my entry for Challenge #2 from the SU-Only Challenge Blog.  I love challenges and am so happy to participate in these SUO challenges!

To make this Milk Carton, first I brayed the card stock.  Then I cut it out with the Milk Carton Die.  Then I stamped the image.  Next I added the highlighting.  Finally I assembled the box.  Be sure to allow it to dry completely in between steps and before assembling box to avoid smudging.  I hope you enjoy this cute little box.


You can see in these four pictures how the wheel image wraps around the entire Milk Carton perfectly.  I am using this wheel unmounted.  See HERE for a tutorial on unmounting your wheels.


A HAUNTIN' WE WILL GO MILK CARTON SUPPLIES:
  • Stamps – Haunting Wheel (#112480, $8.50), Grateful Greetings (#1116511, $36.95)
  • Card stock – Whisper White
  • Ink – Daffodil Delight, Pumpkin Pie, Elegant Eggplant, Basic Black, White Signo Gel Pen
  • Ribbon – Pumpkin Pie 1/4" Grosgrain (#109030, $4.95), Old Olive 1/4" Grosgrain (#111368, $4.95), Rich Razzleberry 1/4" Grosgrain (#120930, $4.95), Hemp Twine (#100982, $2.95) dyed Basic Black
  • Punches – Extra-Large Tag (#119866, $16.95), Large Tag (#119876, $15.95)
  • Accessories – Library Clips (retired) substitute our Mini Library Clips (#109857, $12.95)
  • Tools – Big Shot, Mini Milk Carton Die (#117310, $22.95), Brayer, Stampin' Sponges

Wednesday, September 15, 2010

VINTAGE BLUSHING BLOOMS...

This is another card from my Vintage Vibe class last weekend.  I think everyone had a great time at the class Sunday and I know they learned lots of new techniques.  And I know they loved the cake, because there wasn't a morsel left!  Join us this Saturday for my Christmas Club Class where we will be making 12 more Christmas cards.  You won't want to miss it!


For this card, we used the wonderful Presto Patterns DSP.  Presto is right—presto chango!  This unique Designer Series paper bends to your magical whim, revealing its vintage lines and swirls when you paint it with the brushstrokes of your creativity using an Aqua Painter, a brayer and ink, a sponge and ink, or our luminous Smooch Spritz. Conjure up its vintage-like appeal onto one of your projects to invoke gasps of wonder and awe from all those who behold it.  The top image below shows the pattern grayed out so that you can see it.  However the paper is white with just the design embossed.  The bottom image shows the six patterns once color is added to them. 


We brayed Blushing Bride over the Presto Patterns DSP.  Then we rolled the Music Notes Wheel over it in Soft Suede.  Finally we added antiquing with the Tea Stain from the new Distressing Kit in the catalog.   

The Very Vanilla Taffeta ribbon was antiqued by sponging both sides of the ribbon with the Tea Stain.  Our Taffeta, Satin and Organza ribbons take coloring or dying beautifully.  You can sponge them, Aqua Paint them or dye them with a few drops of reinker in some water.  That way you can get the perfect match to your project.  I love the contrast of this tea stained ribbon with the crochet trim.  The 3" ribbon pieces were gathered between the Antique Brad prongs before putting it through the card front.


After stamping and watercoloring the focal piece, we again used the Tea Stain to antique the image.  Then we added some Dazzling Diamond Dust to the hummingbird and the rose centers.  And the smallest of the Basic Pearl Jewels is a perfect fit for the hummingbird's eye

VINTAGE BLUSHING BLOOMS SUPPLIES:
  • Stamp Sets – Elements of Style (W#118611 $27.95, C#120045 $19.95), Music Notes Wheel (#120327, $6.50)
  • Card stock –  Blushing Bride, Naturals White, Soft Suede, Presto Patterns Specialty DSP
  • Ink – Blushing Bride, River Rock, Soft Suede Classic, Tea Stain
  • Ribbon – Chantilly 1/2" Crochet Trim (#118480, $6.95), Very Vanilla 3/8" Taffeta (#109071, $6.95)
  • Accessories – Basic Pearl Jewels (#119247, $4.95), Antique Brads (#117273, $5.95), Stampin' Dimensionals (#104430, $3.95)
  • Tools – Distressing Essentials Kit (#118762, $19.95, Stampin' Sponges, Stampin' Around Wheel Guide (#104834, $9.95), Aqua Painter (#103954, $16.95), Paper Piercer & Mat


Wednesday, June 16, 2010

RED, WHITE & BLUE SWAP CARDS...

Last night was my downline meeting.  The theme for our swaps was either Red, White & Blue or masculine.  I really liked how my Honoring Old Glory card came out the other day, so I used that as a jumping off point for my swap cards.  It is a very simple card, but I like how it came out.  I really love this wheel!  So many cute areas that you can use for a focal piece!


 RED, WHITE & BLUE PATRIOTIC CARD SUPPLIES:
  • Stamp Sets – July Fourth (W #118523 $18.95  C #120063 $14.95), Red, White & Blue Wheel (#118622, $8.50)
  • Card stock – Night of Navy, Real Red, Whisper White
  • Ink – Real Red, Daffodil Delight, Not Quite Navy, Night of Navy Markers
  • RibbonReal Red 5/8" Grosgrain (#109052, $7.95)
  • PunchesLarge Star (#110710, $15.95)
  • AccessoriesStampin' Dimensionals
  • Tools – Big Shot, Square Lattice Textured Impressions Embossing Folder (#119976, $7.95)

Several people have asked how I colored the wheel image.  If it is a scene (like Haunting) or words, or just something I would like to hand-color with markers, then I unmount the rubber from the wheel.  I still leave the "free-flowing" style as wheels to use for wrapping paper, labels, gift bags, etc.  I only unmount those that I feel need more precise placement. It makes it so much easier to work with and if you have been wheel-challenged up to now, you will find yourself loving our wheels now!

UNMOUNTING WHEELS

1. Slip a craft knife knife under the edge of one side beginning at the seam.  Run the knife all the way around loosening the rubber from wheel.  Repeat on the other side.
2. With your craft knife, cut through the seam until it opens.  Pry each end off the wheel and peel the rubber off the wheel.
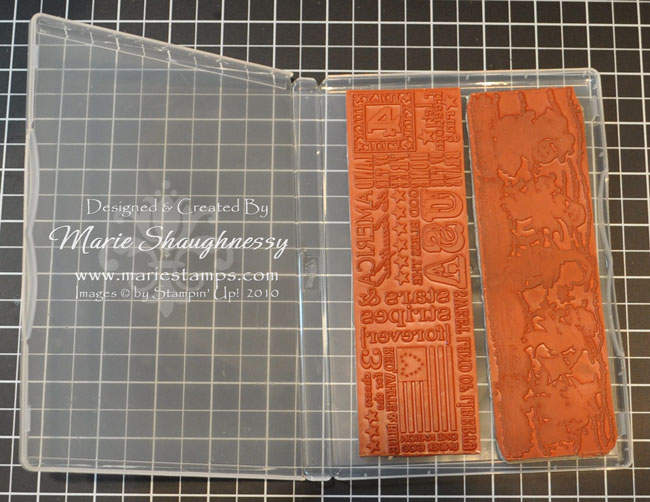
3. Here it is unmounted.   Most of the time, I just use the bare rubber with double-stick tape on a clear block.  A few I have mounted on cling foam, but you don't really have to.

4.  I store the unmounted rubber pieces in a clear mount stamp case (#119105, $4.95/4).  With cling foam, you can fit four in the case.  With just bare rubber, you can fit at least six.


Monday, June 14, 2010

HERE'S TO OLD GLORY!

Today is Flag Day, so in celebration I made this CAS Stars and Stripes card:


Here are few quotes about Old Glory that mean something to me in honor of Flag Day...

"We take the stars from heaven, the red from our mother country, separating it by white stripes, thus showing that we have separated from her, and the white stripes shall go down to posterity, representing our liberty."
 ~ by George Washington, attributed


 "I pledge allegiance to my Flag and the Republic for which it stands, one nation, indivisible, with liberty and justice for all."  ~ by Francis Bellamy, The Youth's Companion, 8 September 1892 

"The flag of the United States has not been created by rhetorical sentences in declarations of independence and in bills of rights. It has been created by the experience of a great people, and nothing is written upon it that has not been written by their life. It is the embodiment, not of a sentiment, but of a history." ~ by Woodrow Wilson 

For this card, I used several products from our Summer Mini Catalog:  Square Lattice Embossing Folder, Red, White & Blue Wheel, and the July Fourth Stamp set.  Our (small) Star Punch is retiring, so be sure to order one before it sells out!

For that matter, be sure you get ALL the retiring punches!  Admittedly, I am a Punchaholic, but honestly, you do not want to miss out on these.  Here's why:

  • Horizontal Slot - awesome for little gift bags, gift card holders and I use it often in Punch Art
  • Trio Flower - use it ALL the time - search my Punch Art for it!
  • Star (small) - love it!
  • Slit - awesome for gift cards and have you seen the slit punch edge technique?  I will show you soon. HAVE TO HAVE!
  • My Way - don't use it a ton, but it does come in handy
  • Double Rectangle - amazingly easy flat bows on cards!
  • Tag Corner - ok, I don't use this one much at all  :(
HONORING OLD GLORY SUPPLIES:
  • Stamp Sets – July Fourth (W #118523 $18.95  C #120063 $14.95), Red, White & Blue Wheel (#118622, $8.50)
  • Card stock – Night of Navy, Whisper White
  • Ink – Real Red, Daffodil Delight, Not Quite Navy, Night of Navy Markers
  • RibbonReal Red 3/4" Polka-Dot Grosgrain (#115605, $4.48), Real Red 1/2" Striped Grosgrain (#110714, $7.95)
  • PunchesStar (#109045, $10.95), Large Star (#110710, $15.95)
  • AccessoriesStampin' Dimensionals
  • Tools – Big Shot, Square Lattice Textured Impressions Embossing Folder (#119976, $7.95)

Saturday, October 31, 2009

A HAUNTING WE WILL GO, Countdown to Halloween Project #22...

This is my "a la Zindorf" tribute!  Try as I might, I just can't get my braying to look anything like Michelle's, but when I saw her Late Night Haunting, I just had to try it at least.  It is such a cute stamp!  It really puts me in the mood for all the little trick or treaters tonight!


HAUNTED HOUSE SUPPLIES:
  • Stamps – Haunting Wheel (#112480) $8.50
  • Card stock – Pumpkin Pie 6" x 10.5", scored @ 5.25
    • Basic Black 6" x 4" 
    • Pumpkin Pie 6" x 3.75"
    • Whisper White 6" x 3.5"
    • Pumpkin Pie & Basic Black scraps for sentiment 
  • Ink – Apricot Appeal, Pumpkin Pie, Elegant Eggplant, Basic Black, Basic Black Craft, White Signo Gel Pen
  • Accessories – 4 Basic Small Grommets in Black,  Black Embossing Powder,
  • Tools – Brayer, sponge, heat tool, Corner Rounder, Stampin' Dimensionals
Marie
Related Posts with Thumbnails