Showing posts with label Alphabet and Number Dies. Show all posts

Friday, September 28, 2012

CAS FRIDAY, Stars for Dad's 80TH Birthday!...

Still catching up on summer projects...

This is a card I made for my father's 80th birthday.  I wasn't up to making much still, so this one is simple.  It's all Big Shot dies for the front with some stamping on the inside.    I used the Inlaid Embossing technique for the background.  Enjoy!


80TH BIRTHDAY STAR SUPPLIES:
  • Stamp Sets – Bring on the Cake (W#121899 $38.95, C#121958 $27.95)
  • Card Stock – Basic Black, Tempting Turquoise, Daffodil Delight, Real Red, Rich Razzleberry, Night of Navy, Lucky Limeade, Tangerine Tango
  • Ink – Lucky Limeade, Night of Navy Classic, Real Red, Daffodil Delight, Rich Razzleberry, Tempting Turquoise Stampin' Write Markers
  • Ribbon – Cherry Cobbler Baker's Twine (#123125, $2.95)
  • Punches – Small Oval (#120908, $12.95), Owl Builder (#118074, $16.95)
  • Tools – Big Shot, Simple Numbers Dies (retired - substitute Typeset Alphabet Dies), Stars #2 Die (retired - substitute Merry Minis Punch Pack star), Top Note Die (#113463, $21.95), Chevron Embossing Folder (#127749, $7.95), Stampin' Dimensionals (#104430, $3.95) 
LOYALTY REWARDS - When you purchase $50 or more, you qualify for my Loyalty Rewards program!  This Frequent Stamper program is my way of saying "thank you" to my returning customers in appreciation of their business and is in addition to other Stampin' Rewards.  Earn FREE stamps with MarieStamps.com!

Monday, September 10, 2012

BABY BOY LANDON'S DIAPER CAKE WITH FULL TUTORIAL...

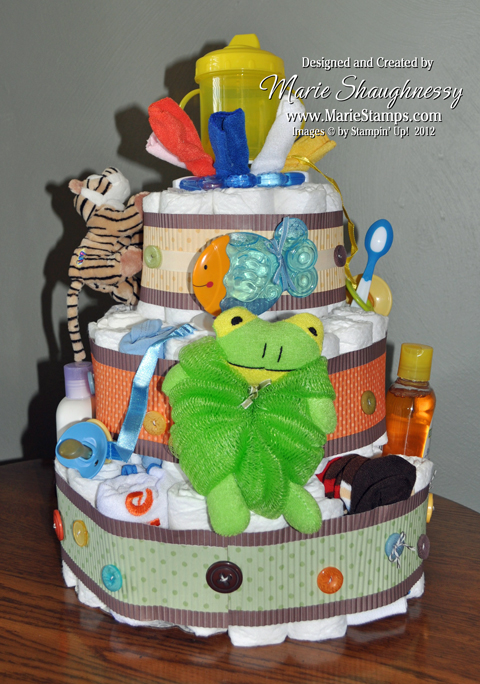
I have always wanted to make one of those cute diaper cakes you see at baby showers.  A friend's daughter is having her second baby boy, so it gave me the perfect opportunity to decorate a Diaper Cake for her shower yesterday.  I had to make a very simple version since I just got back from vacation and had another baby shower Saturday.  :(  Next time I will have to dress it up more!  This time I had to let the baby items serve as most of the "decoration".  The theme for the shower was jungle animals with the colors that I used polka dotted on a chocolate background.  A FREE tutorial for making the base diaper cake follows the supply list.

Baby Landon is due to make his appearance soon (not soon enough for his mommy)!   His big brother Logan is the one I made the nursery letters for a couple of years ago.  He liked the cake so much that he ate the "a" in Landon right off the cake!  I hope you enjoy the diaper cake as well - but not that much!  :o)


Here is the back of the diaper cake:


BABY BOY LANDON'S DIAPER CAKE SUPPLIES:
  • Card Stock – Bashful Blue, Chocolate Chip, Designer Series Paper Patterns Stack
  • Ribbon – Early Espresso Baker's Twine (#123124, $2.95), Whisper White Baker's Twine (#123262, $2.95)
  • Accessories – Brights Designer Buttons (#119747, $8.95), Neutrals Designer Buttons (#119743, $8.95), Subtles Designer Buttons (#119745, $8.95)
  • Tools – Big Shot, Perfect Polka Dots Embossing Folder (#117335, $7.95), Alphabet Simple Letters Dies (retired - can use Typeset Alphabet Dies), Crimper, Mini Glue Dots (#103683, $4.95), Big Shot Multi-purpose Adhesive Sheets (#120805, $14.95)
  • Misc – 12" - 14" Cardboard Cake Base, Baby Powder, Baby Bottle, miscellaneous baby items for decorating the cake
DIAPER CAKE TUTORIAL:
For my diaper cake, I used Pampers Sensitive Swaddlers, Size 2.  The amount of diapers you will use for each ring and layer will depend on the brand and size of diapers, as well as how tightly you roll them.  Don't worry if you need more or less diapers than I used.  After making the cake, I slide out some of the diapers and replace a few of them with rolled up bibs, onsies, socks, etc.

1. Adhere Big Shot Multi-Purpose Adhesive Sheets to the bottom of a Baby Powder container and cut around it tightly.  Peel off the paper backing, and adhere the Baby Powder on the middle of the Cake Base.

2.  Roll up approximately 9 diapers.  To roll, place the diaper flat down on the table with the printed band facing up.  As pictured, I began with "top" of the diaper close to me and rolled toward the crotch of the diaper.  You could choose to do it the opposite direction as well, but you will have to be careful and the diapers get "off" more easily in this direction.  Try to roll them pretty tightly.  Wrap a smaller rubber band around the middle of the diaper.  However, you don't want to make the rubber band so tight that it puckers.  The Swaddlers have a light yellow "line" up the middle of the outside of the diaper, which makes it easy to center the rubber band which is important later.  You may want to roll all your diapers now, so that you will not have to stop and roll for each cake layer.

3.  Stand the diapers up around the Baby Powder.  It may take more or less than the 9 diapers depending on what type and size of powder and/or diapers you have.  Wrap a larger rubber band around this ring, so that it hugs the powder as shown.

4.  Roll approximately 14 more diapers.  Stand the diapers up to form a second ring around the first ring. Wrap a larger rubber band around this second ring.  Secure the entire ring with a rubber band, making sure it does not pucker them.  It will help it stand up straighter.

5. Roll approximately 20 more diapers.  Stand the diapers up to form a third ring around the second ring. Wrap a large rubber band around this third ring or tie with Baker's Twine if you do not have a large enough rubber band.  Remember that you don't want it to pucker much.  This last ring should be hitting the outer edge of the cake base or even covering it if using a 12" cake base.  Wrap with an additional rubber band or Baker's Twine for more security.  Be sure all the bands are aligned in the center of the diapers as this is your outer ring, so you want it to be neat.

6.  Adhere a bunch of Mini Glue Dots along the edge of the bottom of an inexpensive 4 oz. Baby Bottle.  Adhere the Baby Bottle to the top of the Baby Powder as pictured.

7.  Roll approximately 9 more diapers. Stand the diapers up around the Baby Powder & Baby Bottle on top of the first layer.  This will be the first ring of your second layer.  Wrap a larger rubber band around this ring, so that it hugs the powder/bottle as shown.


8.  Roll approximately 14 more diapers.  Stand the diapers up to form a second ring around the first ring of the second layer. Wrap a larger rubber band around this second ring.  Secure the entire ring with a rubber band, making sure it does not pucker them.  Again, be sure all the rubber bands are aligned in the center as this is your outer ring of the second layer.

9.  Roll approximately 7 more diapers.  Stand the diapers up around the top of the Baby Bottle on top of the second layer.  Wrap a rubber band around the last ring to form the third and top layer of the cake.  The diapers will be a little taller than the Bottle.  

10.  Add a cute topper like a stuffed animal or baby toy and decorate your "cake" as pictured at the top of the post.

LOYALTY REWARDS - When you purchase $50 or more, you qualify for my Loyalty Rewards program!  This Frequent Stamper program is my way of saying "thank you" to my returning customers in appreciation of their business.  Earn FREE stamps with MarieStamps.com!
STAMPIN' REWARDS -  Anytime you place a product order with me of $150 or more, you earn your choice of FREE Stampin' Up! products including hostess stamp sets. Check out my Stampin' Rewards page for full information on these two programs.

Saturday, March 3, 2012

GOLDEN ANNIVERSARY CARD FOR MY PARENTS...

Today is my parent's 50th Anniversary.  Earlier this week, I shared the Golden Anniversary Favor Boxes that I made for the party.  This is the card I made for them to match the boxes with the same flowers, the "50" (although I glittered it this time) and embossed scrolls. 

I really wanted to use a photo from my parent's wedding in the card.  Our new Framelits are PERFECT to see exactly where you want to cut out your photo or your stamped images.  Behind the photo I used the next size up heart and embossed it with the Finial Press Embossing Folder and mounted it all with Stampin' Dimensionals.  Enjoy!


For the inside, I used two of the hearts I had left over from the favor boxes.

Here is a picture of my parents from the party:

GOLDEN ANNIVERSARY CARD SUPPLIES:
  • Stamp Set – Baroque Motifs (#113490, $27.95), Take It To Heart (W#125520 $29.95, C#125525 $23.95), A Word for You (W#117032 $21.95, C#120528 $16.95), Curly Cute (W#117014 $19.95, C#120510, $14.95)
  • Card Stock – Brushed Gold
  • Ink – VersaMark, VersaMarker
  • Punches – Itty Bitty Shapes Punch Pack (#118309, $16.95)
  • Accessories – Dazzling Details (#125580, $2.50), Medium Flat Cello Bags (#102757, $4.50), Galaxy Gold Fine Stampin' Glitter (#114286, $13.95)
  • Tools – Big Shot, Fancy Favor Die (#115965, $39.95), Hearts Collection Framelits (#125599, $26.95), Timeless Type Alphabet Junior Sizzlit Dies (#115951, $74.95), Finial Press Embossing Folder (#115963, $7.95), Stampin' Dimensionals (#104430, $3.95), Mini Glue Dots, White Signo Gel Pen

LOYALTY REWARDS - When you purchase $50 or more, you qualify for my Loyalty Rewards program!  This Frequent Stamper program is my way of saying "thank you" to my returning customers in appreciation of their business and is in addition to other Stampin' Rewards.  Earn FREE stamps with MarieStamps.com!

Wednesday, February 29, 2012

GOLDEN ANNIVERSARY FANCY FAVOR BOXES...

Next weekend is my parent's 50th Anniversary.  I've been working all week on these favors for their Golden Anniversary Party.  I finally finished them today.  When I made the sample I was thinking that they were pretty easy and could easily make many of them.  And they are if making one or two for a gift, etc.  However, when making them in mass, I would leave the flowers off.  Punching and shaping 22-23 flowers for each one took a  LOT of time!  Next time...


I can't tell you how much I love our new Framelits!  They are perfect for this type of project where a punch can't get far enough in to cut the hole or it's not large enough.  I could cut a heart out right in the middle of the the Fancy Favor die cut. 

Next, I embossed the box with a Baroque Motifs stamp and gold embossing powder.  Then I adhered a window sheet behind the heart cut-out on the inside of the box.  I punched out the flowers and shaped them into a bowl shape by pressing them onto the end of a White Signo Gel Pen.  I put a dot of Dazzling Detail in the center of each flower and then quickly dipped it in the Galaxy Gold Glitter.  Then I adhered them around the heart opening with Mini Glue Dots and glued the 5 0 on the window sheet with Multi glue.  I put 50th Anniversary candies in a cello bag and tied a ribbon on and they were done.  Can't wait to see how everyone likes them!


GOLDEN ANNIVERSARY FAVOR BOX SUPPLIES:
  • Stamp Set – Baroque Motifs (#113490, $27.95)
  • Card Stock – Brushed Gold
  • Ink – VersaMark
  • Punches – Itty Bitty Shapes Punch Pack (#118309, $16.95)
  • Ribbon – Crumb Cake 3/8" Taffeta (#122966, $6.95)
  • Accessories – Dazzling Details (#125580, $2.50), Medium Flat Cello Bags (#102757, $4.50), Galaxy Gold Fine Stampin' Glitter (#114286, $13.95)
  • Tools – Big Shot, Fancy Favor Die (#115965, $39.95), Hearts Collection Framelits (#125599, $26.95), Timeless Type Alphabet Junior Sizzlit Dies (#115951, $74.95), Sticky Strip (#104294, $6.95), Mini Glue Dots, White Signo Gel Pen

LOYALTY REWARDS - When you purchase $50 or more, you qualify for my Loyalty Rewards program!  This Frequent Stamper program is my way of saying "thank you" to my returning customers in appreciation of their business and is in addition to other Stampin' Rewards.  Earn FREE stamps with MarieStamps.com!

Sunday, July 10, 2011

LOGAN'S SCRAPBOOK, Page 10, 11 & 12...

Here are the last three pages of Logan's Scrapbook!  I included some blank pages, supplies and embellishments, so that Adrianna could add more pages in where she saw fit.


On Page 10, I once again scored vertical lines every 1" for added interest. Since I was running low Sailboat embellishments from the Scrappin' Kit, I just punched out some of my own.  Pretty good match, right?  I left a spot for the "month" sticker that corresponds to the picture Logan's mom chooses.


For page 11, I just had to include the "little man" phrase.  I also punched out another sailboat to  keep the pages coordinated.  Other than that, I kept it simple.


Since page 12 is his first birthday page, I included some jungle animals to match his birthday theme.  I also used the Petite Pennants Builder punch to punch a pennant banner for the top. 

I hope you enjoyed seeing Logan's Scrapbook and it's easy layouts that I know you can make, too!

LOGAN'S FIRST YEAR SB PAGE 10, 11 & 12 SUPPLIES:
  • Stamp Set – Fox & Friends (W#117020 $18.95, C#118565 $14.95)
  • Card stock – So Saffron, Bashful Blue, Tangerine Tango, Whisper White, Chocolate Chip, Kiwi Kiss (retired), Tall Tale DSP ($3.49 on my Clearance Rack), Good Morning Sunshine (available on my Retired 4 Sale List) 
  • Ink – More Mustard, Chocolate Chip, Blush Blossom, Old Olive, Always Artichoke, Tangerine Tango, Peach Parfait, Soft Suede Stampin' Write Markers 
  • Punches – Petite Pennants Builder (#122361, $16.95), Scallop Edge Border (#119882, $15.95), 2-1/2" Circle (#120906, $16.95)
  • Ribbon – Chocolate Chip 1/4" Grosgrain, White Baker's Twine (#124262, $2.95), Dusty Durango Polka Dot ($3.49 on my Clearance Rack), Kiwi Kiss 5/8" Striped Grosgrain ($3.49 on my Clearance Rack)
  • Accessories – Rock-a-Bye Boy Simply Scrappin' Kit (retired)
  • Tools – Big Shot, Square Lattice Embossing Folder (#119976, $7.95), Stars #2 Die (#118138, $11.95),  Alphabet Simple Numbers (#115968, $44.95), Timeless Type Junior Alphabet die set (#115951, $74.95)

Friday, July 8, 2011

LOGAN'S SCRAPBOOK, Page 5, 6 & 7...

Today I have pages 5, 6 and 7 of Logan's First Year Scrapbook to share.  I completely forgot to post the rest of the pages from his scrapbook several weeks ago!  I will share the others over the weekend.


Page 5 has either two photo spots or one large photo spot with journaling on the left.  The adorable whale paper is from the Tall Tale DSP available in my Clearance Rack for only $3.49.  Perfect for children's projects!


Page 6 features one photo spot and lots of fun DSP circles.  I also left plenty of room (as on many of the pages) for Adrianna, Logan's mom, to add embellishments from the Rock-a-Bye Simply Scrappin' Kit like the "months" sticker that corresponds to his age.


Page 7 has at least four spots for square pics in the corners.  Again, I left the embellishments up to Logan's Mom, so she can choose the ones that best fit the pictures.  Enjoy!

LOGAN'S FIRST YEAR SB PAGE 5, 6 & 7 SUPPLIES:
  • Card stock – So Saffron, Bashful Blue, Tangerine Tango, Whisper White, Chocolate Chip, Kiwi Kiss (retired), Tall Tale DSP ($3.49 on my Clearance Rack), Good Morning Sunshine (available on my Retired 4 Sale List)
  • Punches – Scallop Edge Border (#119882, $15.95) 
  • Ribbon – Chocolate Chip 1/4" Grosgrain, Linen Thread, Dusty Durango Polka Dot ($3.49 on my Clearance Rack)
  • Accessories – Rock-a-Bye Boy Simply Scrappin' Kit (retired)
  • Tools – Big Shot, Square Lattice Embossing Folder (#119976, $7.95), Stars #2 Die (#118138, $11.95),  Circles #2 Die (#114526, $15.95), Timeless Type Junior Alphabet die set
Related Posts with Thumbnails