Thursday, September 30, 2010

SPOOKY STAMP CAMP, Coffin Treat Box...

This the 5th and final project from my Spooky Stamp Camp last week. I was asked my one of my downline to CASE the coffin and gravestone from the Idea Book & Catalog.  The picture of the Coffin wasn't large enough to easily determine the project and I prefer a traditional coffin shape (she did, too), so I just came up with my own.  I found a coffin on Martha Stewart and used her general idea, but made my own template as I wanted different dimensions on mine. I was trying to make it closer in size to the gravestone, but it's still a little big for it!  Jenni opted to use her gravestone on her coffin.  To get the "wood" texture on the coffin lid, I used the woodgrain texture plate.  Hope you enjoyed my Spooky Stamp Camp projects!


COFFIN TREAT BOX SUPPLIES:
  • Stamp Sets – Graveyard Gala (#115458, $20.95), From the Crypt (#115460 $22.95)
  • Card stock – Basic Gray, Basic Black, Whisper White, Wicked Fun Specialty DSP (#117400, $11.95)
  • Ink – Basic Black Classic, Whisper White Craft, White Signo Gel Pen
  • Punches – Bitty Bat (#119279, $15.95)
  • Accessories – Stampin' Dimensionals (#104430, $3.95)
  • Tools – Big Shot, Texture Plates Kit #4 (#114531, $9.95), Stampin' Sponges, Paper Snips

Wednesday, September 29, 2010

SPOOKY STAMP CAMP, Spooky Candy Wrapper...

Here is project #4 from my Spooky Stamp Camp.  This project uses the brand new Candy Wrapper Die from the Holiday Mini Catalog.  Isn't this die adorable?  The Candy Wrappers are perfect for wedding or shower favors, classroom gifts, birthday parties, etc.  For the class, we made the Spooky Candy Wrapper, but I thought you might like to see some of the others that I came up with as well.  I made an Old Olive one, too, but I misplaced it somehow.  I'll show it another day when I find it.  They are all very quick and easy - nothing complicated or fussy.  Enjoy!


SPOOKY CANDY WRAPPER (Top) SUPPLIES:
  • Stamp Sets – Wicked Cool (W#118738 $19.95, C#120600 $14.95)
  • Card stock – Cajun Craze, Old Olive, Whisper White, Wicked Fun Specialty DSP (#117400, $11.95)
  • Ink – Basic Black, Rich Razzleberry Classic
  • Ribbon – Raven 1/2" Lace Trim (#120988, $5.95)
  • Punches – Scallop Oval (#119856, $16.95), 1-3/4" x 7/8" Oval Large (#119855, $15.95)
  • Accessories – Stampin' Dimensionals (#104430, $3.95)
  • Tools – Big Shot, Candy Wrapper Die (#120890, $32.95), Stampin' Sponges

Monday, September 27, 2010

SPOOKY STAMP CAMP, A Hauntin' We Will Go Milk Carton

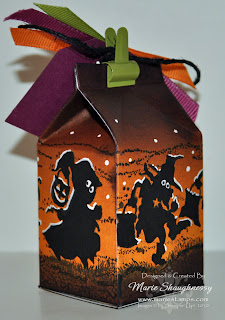
Here is the third project from my Spooky Stamp Camp.  This little treat is made using our adorable Mini Milk Carton Die.  It gave everyone a chance to exercise their braying skills which they love having the chance to do.  Can you believe this started as just a plain white piece of card stock?  Braying is just so cool to do!  And the results are always stunning.

I also selected this project for my entry for Challenge #2 from the SU-Only Challenge Blog.  I love challenges and am so happy to participate in these SUO challenges!

To make this Milk Carton, first I brayed the card stock.  Then I cut it out with the Milk Carton Die.  Then I stamped the image.  Next I added the highlighting.  Finally I assembled the box.  Be sure to allow it to dry completely in between steps and before assembling box to avoid smudging.  I hope you enjoy this cute little box.


You can see in these four pictures how the wheel image wraps around the entire Milk Carton perfectly.  I am using this wheel unmounted.  See HERE for a tutorial on unmounting your wheels.


A HAUNTIN' WE WILL GO MILK CARTON SUPPLIES:
  • Stamps – Haunting Wheel (#112480, $8.50), Grateful Greetings (#1116511, $36.95)
  • Card stock – Whisper White
  • Ink – Daffodil Delight, Pumpkin Pie, Elegant Eggplant, Basic Black, White Signo Gel Pen
  • Ribbon – Pumpkin Pie 1/4" Grosgrain (#109030, $4.95), Old Olive 1/4" Grosgrain (#111368, $4.95), Rich Razzleberry 1/4" Grosgrain (#120930, $4.95), Hemp Twine (#100982, $2.95) dyed Basic Black
  • Punches – Extra-Large Tag (#119866, $16.95), Large Tag (#119876, $15.95)
  • Accessories – Library Clips (retired) substitute our Mini Library Clips (#109857, $12.95)
  • Tools – Big Shot, Mini Milk Carton Die (#117310, $22.95), Brayer, Stampin' Sponges

Sunday, September 26, 2010

SPOOKY STAMP CAMP, Along Came a Spider...


These are projects from my Spooky Stamp Camp.  Don't they just put you in the Halloween mood?  Project #2 is a remake of a project I made last summer and posted in October 2009:  Sweet Treat Spider Ornament.  When I saw the new Spider Web Embossing Folder in the Holiday Mini Catalog, I just knew I had to use it to redo this cute little treat for you.  After finishing it, I realized that little spider looks like he came to visit from Virginia Tech!  Maybe they need a new mascot?  :D  


ALONG CAME A SPIDER TREAT SUPPLIES:
  • Card stock – Basic Black, Whisper White, Rich Razzleberry, Tangerine Tango
  • Stamps – Sweet Centers (#116521, $29.95)
  • Ink – Basic Black Classic, Whisper White Craft
  • Punches – 1-1/4" Circle (#119861, $15.95), 1-3/8” Circle (#119860, $15.95),  1-3/4" Circle (#119850, $16.95), 1-3/4" Scallop Circle (#119854, $16.95), Photo Corners XL (#119878, $16.95)
  • Ribbon – Rich Razzleberry 1/4" Grosgrain (#120930, $4.95),
  • Adhesives – Sticky Strip, Snail, Crystal Effects
  • Accessories – Sweet Treat Cup, Wiggle Eyes
  • Tools – Big Shot, Top Note Die, Spider Web Embossing Folder (#120889, $7.95), Sponge Dauber, Stampin' Sponges

Saturday, September 25, 2010

SPOOKY STAMP CAMP, Wicked Cool Witch Boots...

Today was my annual Halloween Spooky Stamp Camp.  Lots of spooky goodness going on!  I had to stop myself from making more and more projects.  I figured the ladies would want to go home at some point!  Some of the extra projects will probably show up here eventually.

This Halloween card is the first project to share.  Jenni designed this card. I let her teach it, too, and I made my own along with everyone else so I would have a sample card.  It finally came out well, but I had the dickens of a time with it.  Everything seemed to go wrong and I fell way behind the rest of the group!  But I finished it up in time to take this picture to share with you.  So, you see - I, too, can have as much difficulty as anyone else - for those of you who think I stamp everything perfectly all the time.  LOL.  Enjoy!


WICKED COOL WITCH BOOTS SUPPLIES:
  • Stamp Sets – Wicked Cool (W#118738 $19.95, C#120600 $14.95)
  • Card stock – Rich Razzleberry, Whisper White, Wicked Fun Specialty DSP (#117400, $11.95), Waffle Paper (Assortment 2) Basic Black (#120985, $9.95)
  • Ink – Basic Black Classic, Whisper White Craft, Old Olive, Pumpkin Pie, Old Olive, Basic Black Markers
  • Ribbon – Raven 1/2" Lace Trim (#120988, $5.95), Basic Black 1/8" Taffeta Ribbon (#119261, $5.95)
  • Punches – 2-3/8" Scallop Circle XL (#118874, $16.95), 1-3/4" Scallop Circle (#119854, $16.95), Designer Label (#119862, $15.95)
  • Accessories – Iridescent Ice Embossing Powder
  • Tools – Stampin' Sponges

Wednesday, September 22, 2010

CHRISTMAS CLUB #2 CLASS, Christmas in the Woods...

This is the final card from my Christmas Club #2 Class. For this one I was going for a natural/country feeling that was pretty simple. I try to hit different styles and colors so there is something for everyone.

The front panel is embossed using a thin chipboard frame.  Patty Bennett posted a nice tutorial for this technique last year here, so I won't reinvent the wheel.  You can also purchase an extra folder (they're only $7.95) and cut an oval into your folder - it will have the same effect.

I added dots of Multi glue and glittered them (each color separately).  If you want to save yourself some time, just glitter them all one color.  Gold would be pretty!  You could just leave the embossing unaccented, but I decided to color the dots.  It gives it a more quilted/country appearance.  I used Cherry Cobbler (the Bravo Burgundy was too dark and didn't match the paper for some reason) on the berries and Always Artichoke for the other dots.  And that's it - emboss, one stamp and glitter!  Enjoy!


CHRISTMAS IN THE WOODS SUPPLIES:
  • Stamp Sets – Lovely As A Tree (#115026 $27.95)
  • Card stock – Bravo Burgundy, Always Artichoke, Very Vanilla
  • Ink – Always Artichoke Classic, Cherry Cobbler, Always Artichoke, Soft Suede Marker
  • Accessories – Multipurpose Glue or Crystal Effects, Assorted Fine Stampin' Glitters $13.95 (Cosmo #108796, Supernova #114287, Galaxy #114286)
  • Tools – Big Shot, Petals-a-Plenty Textured Impressions Embossing Folder (#116824, $7.95)
  • Non-SUThin wood frame with an oval cut-out


Tuesday, September 21, 2010

FLOWER POWER FOR SARAH...

Today I am posting in honor of Marian Swain's (one of my sidelines) daughter.  I hope she won't mind me posting this for all of you - I believe in the power of all our prayers joining together.  Please keep Sarah and her family in your thoughts and prayers today.  I know I will be!

Flower Power for Sarah

This is a special request for Marion's daughter Sarah who has Biphenotypic Leukemia.  Sarah and Marion are at Duke where Sarah is going through the preparatory process for bone marrow transplant.  Marion has asked that we put Sarah in our prayers and make a flower to wear today.

Flower Power for SarahMarion's Note ~ September 21st--That is the day Sarah receives her bone marrow transplant. She will receive stem cells from 2 cord blood units that day. The analogy the doctor's use is replanting a garden. So that is why I chose a flower to symbolize this important day."

Marion's flowers

These are the flowers that Marion is making for the staff at Duke and for Sarah's many friends. One of her friends designed the 'flower power button' for Sarah, above.  Marion thought we might like to make a flower and wear it today with positive thoughts and prayers for Sarah.


Monday, September 20, 2010

CHRISTMAS CLUB CLASS #2, Happy Holidays Snowglobe...

Today is a sad day. :(  I had a minor disaster.  Don't worry - no one hurt or ill!  But one of the shelves in my china cabinet broke sending all my Longaberger dishes tumbling to the floor.  Almost all were made in America (little of the pottery is now) and I had full color sets with some of the colors and many of the pieces no longer available.  I LOVE my Longaberger pottery!  Even worse (according to hubby) is that it damaged our fairly new hardwood floor.   And I am so sad now...  I know they are just things and far worse happens in life.  I count my blessings every day.  But I am having a little bit of a pity party for myself today...

Enough of that!  On with the cards, right?  This is the third card from my Christmas Cards #2 Class.  In the Holiday Mini, there is a really cute Sweet Snowglobe stamp that didn't make the short list for my first budgeted Holiday Mini purchase.  But I really wanted to make a snowglobe with the Sweet Treat Cup, so I made my own!  I stamped the snowman tag from Tags til Christmas without the to and from colored, added the cup and punched a little stand from the XL Tag punch.  Voilà - instant snowglobe!  Enjoy!


HAPPY HOLIDAYS SNOWGLOBE SUPPLIES:
  • Stamp Sets – Tags til Christmas (W #120847 $30.95 C #121169 $22.95), Four the Holidays (#116921, $13.95)
  • Card stock – Whisper White, Marina Mist, Real Red
  • Ink – Whisper White Craft, Marina Mist, Real Red, Pumpkin Pie Markers, White Signo Gel Pen
  • Ribbon – Whisper White 5/8" Organza  (#114319, $5.95)
  • Punches1-¾” Circle (#119850, $16.95), Extra-Large Tag (#119866, $16.95)
  • Accessories – Sweet Treat Cups (#116802, $2.95), Stampin' Dimensionals (#104430, $3.95), Dazzling Diamonds Glitter (#102023, $4.50), 2-way Glue Pen, Snowflakes & Mica,
  • Tools – Big Shot, Northern Flurry Textured Impressions Embossing Folder (#120902, $7.95), White Stampin' Emboss Powder (#109132, $4.75)


Sunday, September 19, 2010

CHRISTMAS CLUB CLASS #2, Wreath of Christmas Greetings...

It has been such a nice weekend here.  We have finally been able to turn off the AC and open all the windows.  I love having the fresh air flowing through the house!  Unfortunately my allergies do not.  :(  I'm not letting it stop me though!

This is the second card from my Christmas Club Class #2.  This one is also a CAS card - so quick to make!  You could make dozens of these in no time.  For the class, the ladies used 3/16" Real Red circles for the holly berries as I didn't have enough of the little brads (27 per person!) for everyone. Another great idea would be to color or glitter our new Basic Pearl Jewels red.  That would look awesome! 


WREATH of CHRISTMAS GREETINGS SUPPLIES:
  • Stamp Sets – Grateful Greetings  (#1116511, $36.95)
  • Card stock – Whisper White, Pear Pizzazz, Real Red (in place of brads)
  • Ink – Pear Pizzazz, Real Red Classic
  • Ribbon – Real Red 5/8" Grosgrain (#109052, $6.95)
  • Punches – 2-3/8" Scallop Circle XL (#118874, $16.95), 1-1/4" Circle (#119861, $15.95), Crop-A-Dile (#108362, $29.95)
  • Accessories – Rhinestone Fire Circle Brads (#109110, $10.95), Stampin' Dimensionals (#104430, $3.95)
  • Tools – Big Shot, Scallop Circles #2 Die (#113469, $19.95), Backgrounds 1 Texturz Plates (#114512, $11.95), Paper Piercer & Mat, Stampin' Sponges


Saturday, September 18, 2010

CHRISTMAS CLUB CLASS #2, Tidings of Comfort & Joy...

Today was my second Christmas Club Class.  Everyone completed twelve Christmas cards while having fun and enjoying a yummy Pumpkin Cream Cheese Roll.  Our next Christmas card class is October 23 - you don't want to miss it!  I will have more new Holiday Mini items by then to feature!  I may schedule a weekday daytime repeat of this weekend's class if there is enough interest.  Let me know if you would like one. 

The first card up is a Clean & Simple one.  Jenni really wanted to do a blue and silver card, so I designed this quick one for her.  The chunky glitter around the Top Note die cut is our new Glass Glitter from the Holiday Mini (pg. 21).  Adds the perfect vintage or retro touch to an otherwise modern card.  The sentiment is from the fabulous Word Play stamp set.  I really like the fun sayings in this set.  Hope you enjoy this nice easy to make card!


TIDINGS OF COMFORT & JOY SUPPLIES:
  • Stamps Word Play (W#120308 $41.95, C#120651 $28.95)
  • Card stock Night of Navy, Bashful Blue, Brushed Silver
  • Ink – Night of Navy Marker, VersaMark, White Signo Gel Pen
  • Accessories Silver Glass Glitter (Holiday Mini, pg. 21 - #120995, $3.95), Silver Embossing Powder, Multipurpose Liquid Glue (Multi)
  • Tools – Big Shot, Top Note Die (#113463, $21.95), Holiday Windows Magentic Movers & Shapers (#116821, $29.95)

Related Posts with Thumbnails