Friday, September 28, 2012

CAS FRIDAY, Stars for Dad's 80TH Birthday!...

Still catching up on summer projects...

This is a card I made for my father's 80th birthday.  I wasn't up to making much still, so this one is simple.  It's all Big Shot dies for the front with some stamping on the inside.    I used the Inlaid Embossing technique for the background.  Enjoy!


80TH BIRTHDAY STAR SUPPLIES:
  • Stamp Sets – Bring on the Cake (W#121899 $38.95, C#121958 $27.95)
  • Card Stock – Basic Black, Tempting Turquoise, Daffodil Delight, Real Red, Rich Razzleberry, Night of Navy, Lucky Limeade, Tangerine Tango
  • Ink – Lucky Limeade, Night of Navy Classic, Real Red, Daffodil Delight, Rich Razzleberry, Tempting Turquoise Stampin' Write Markers
  • Ribbon – Cherry Cobbler Baker's Twine (#123125, $2.95)
  • Punches – Small Oval (#120908, $12.95), Owl Builder (#118074, $16.95)
  • Tools – Big Shot, Simple Numbers Dies (retired - substitute Typeset Alphabet Dies), Stars #2 Die (retired - substitute Merry Minis Punch Pack star), Top Note Die (#113463, $21.95), Chevron Embossing Folder (#127749, $7.95), Stampin' Dimensionals (#104430, $3.95) 
LOYALTY REWARDS - When you purchase $50 or more, you qualify for my Loyalty Rewards program!  This Frequent Stamper program is my way of saying "thank you" to my returning customers in appreciation of their business and is in addition to other Stampin' Rewards.  Earn FREE stamps with MarieStamps.com!

Thursday, September 20, 2012

JENNI'S 30TH BIRTHDAY FAVORS...

Catching up on some of the projects made this summer...

Back in July, only a day after getting home from my second (unexpected) hospitalization this summer, we were hosting my daughter Jenni's 30th birthday party at our house.   I had planned to make some birthday favors for her party during the week before.  Since I was in the hospital all week, I only had a very little bit of time to make these - especially since I could only sit up for a short while.  So they had to be very quick and easy favors - even with a bit of help from my very "uncrafty" mom and daughters.

I had bought some black "50 sucks" lollipops for my husband's 50th birthday last year and decided to take that idea and make my own version for Jen's party.  Just two punches, some crimping on one and punching a hole in the center of each punch was all it took to dress up some Tootsie Roll Pops and make a cute centerpiece.  The little medallion was made with My Digital Studio.


My second project was a little treat bag for everyone to take with them when they left.  I used the adorable It's a Wrap Occasions stamp set to stamp "happy cake day" on 1" x 2-3/4" piece of Whisper White card stock.   Then I just wrapped the pieces around Hershey Nuggets.  So simple!


Here is a picture I took at the party:


30 SUCKS CENTERPIECE SUPPLIES:
  • Stamp Sets – It's a Wrap Occasions (W#123590 $27.95, C#123592 $19.95)
  • Card Stock – Whisper White, Basic Black, Brights Designer Series Paper Patterns Stack (#117155, $21.95)
  • Ink – Melon Mambo
  • Punches – Blossom (#125603, $16.95), Fancy Flower (#118073, $16.95)
  • Tools – Paper Crimper, Crop-A-Dile
  • Misc. – Nuggets, Lollipops & Tootsie Rolls, Organza Gift Bag
LOYALTY REWARDS - When you purchase $50 or more, you qualify for my Loyalty Rewards program!  This Frequent Stamper program is my way of saying "thank you" to my returning customers in appreciation of their business and is in addition to other Stampin' Rewards.  Earn FREE stamps with MarieStamps.com!

Monday, September 17, 2012

MDS MONDAY, Frightening Feline Swap Card...

I LOVE MDS 2!!!  I think I've mentioned this before, but it bears repeating!  This is the third swap that I made for the Providence Regional Event that I attended in August.  It is a hybrid card as I created the focal piece in My Digital Studio and printed it out 6 to a sheet on Very Vanilla card stock.  Then I cut them out with the Window Frame Framelits from the Holiday Catalog, just as I would a stamped image and assembled my card.


Here is a closeup of the MDS part.  Isn't it fabulous how you can color each individual letter or word with MDS 2?  You can even do a two or three toned swipe across your words.  LOVE IT!!!  The Frightening Feline is also available as a regular stamp in the Holiday Catalog.


Here is a video on how to individually color stamps in MDS 2:


If viewing this post in an email, please click through to the post:  MDS Monday Frightening Feline
Try MDS 2 yourself FREE for 30 days in my Online Store.

FRIGHTENING FELINE MDS SWAP SUPPLIES:
  • Stamp Sets – MDS Frightening Feline, Spooky Bingo Bits (W#123944 $37.95, C#123946 $27.95)
  • Card Stock – Basic Black, Very Vanilla, Tangerine Tango, Howlstooth & Scarringbone DSP
  • Ink – VersaMark
  • Ribbon – Basic Black 3/8" Taffeta (#119962, $6.95)
  • Punches – 1-1/4" Scallop Punch (#127811, $15.95), 1" Circle Punch (#119868, $12.95)
  • Accessories – Tangerine Tango Embossing Powder (#119859, $16.95)
  • Tools – Big Shot, Window Frame Framelits (#129021, $26.95), Chevron Embossing Folder (#127749, $7.95), Stampin' Dimensionals (#104430, $3.95) 
LOYALTY REWARDS - When you purchase $50 or more, you qualify for my Loyalty Rewards program!  This Frequent Stamper program is my way of saying "thank you" to my returning customers in appreciation of their business and is in addition to other Stampin' Rewards.  Earn FREE stamps with MarieStamps.com!

Thursday, September 13, 2012

CAS HAPPY APPLE DAY SWAP...

Today I have the second swap I made for the Providence Regional to share with you.  I made 40 of these, so I didn't want to get too complicated with it.  This card was inspired by the towel band pictured in the Holiday Catalog.  I used the adorable Perfectly Preserved Stamp Set for it.  They have Framelits to match this stamp set which I love, but I kept it simple for this one.  For the sentiment I used my go to set - Friendly Phrases.


I couldn't resist using my favorite lacy Finishing Touches Edgelit for the border though.  It adds just the right touch!  The apples are stamped in different red inks along with one in the new In Color Gumball Green.  Enjoy!

HAPPY APPLE DAY SUPPLIES:
  • Stamp Sets – Perfectly Preserved (W#126690 $28.95, C#126692 $20.95), Friendly Phrases (W#126149 $18.95, C#126151 $14.95)
  • Card Stock – Crumb Cake, Riding Hood Red, Lucky Limeade
  • Ink – Cherry Cobbler, Real Red, Riding Hood Red, Gumball Green, Lucky Limeade Classic, Real Red, Lucky Limeade, Crumb Cake Stampin' Write Markers
  • Ribbon – Lucky Limeade 3/8" Ruffled (#122977, $9.95)
  • Tools – Big Shot, Finishing Touches Edgelits (#127010, $9.95), Perfect Polka Dot Embossing Folder (#117335, $7.95), Color Spritzer Tool (#107066, $12.95) 

LOYALTY REWARDS - When you purchase $50 or more, you qualify for my Loyalty Rewards program!  This Frequent Stamper program is my way of saying "thank you" to my returning customers in appreciation of their business and is in addition to other Stampin' Rewards.  Earn FREE stamps with MarieStamps.com!

Monday, September 10, 2012

BABY BOY LANDON'S DIAPER CAKE WITH FULL TUTORIAL...

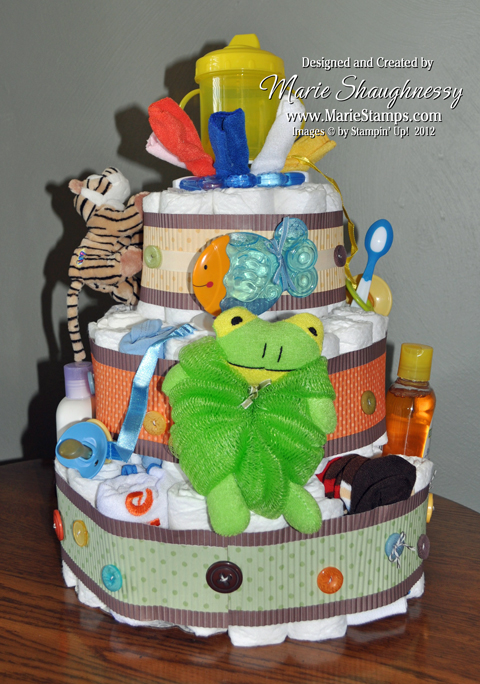
I have always wanted to make one of those cute diaper cakes you see at baby showers.  A friend's daughter is having her second baby boy, so it gave me the perfect opportunity to decorate a Diaper Cake for her shower yesterday.  I had to make a very simple version since I just got back from vacation and had another baby shower Saturday.  :(  Next time I will have to dress it up more!  This time I had to let the baby items serve as most of the "decoration".  The theme for the shower was jungle animals with the colors that I used polka dotted on a chocolate background.  A FREE tutorial for making the base diaper cake follows the supply list.

Baby Landon is due to make his appearance soon (not soon enough for his mommy)!   His big brother Logan is the one I made the nursery letters for a couple of years ago.  He liked the cake so much that he ate the "a" in Landon right off the cake!  I hope you enjoy the diaper cake as well - but not that much!  :o)


Here is the back of the diaper cake:


BABY BOY LANDON'S DIAPER CAKE SUPPLIES:
  • Card Stock – Bashful Blue, Chocolate Chip, Designer Series Paper Patterns Stack
  • Ribbon – Early Espresso Baker's Twine (#123124, $2.95), Whisper White Baker's Twine (#123262, $2.95)
  • Accessories – Brights Designer Buttons (#119747, $8.95), Neutrals Designer Buttons (#119743, $8.95), Subtles Designer Buttons (#119745, $8.95)
  • Tools – Big Shot, Perfect Polka Dots Embossing Folder (#117335, $7.95), Alphabet Simple Letters Dies (retired - can use Typeset Alphabet Dies), Crimper, Mini Glue Dots (#103683, $4.95), Big Shot Multi-purpose Adhesive Sheets (#120805, $14.95)
  • Misc – 12" - 14" Cardboard Cake Base, Baby Powder, Baby Bottle, miscellaneous baby items for decorating the cake
DIAPER CAKE TUTORIAL:
For my diaper cake, I used Pampers Sensitive Swaddlers, Size 2.  The amount of diapers you will use for each ring and layer will depend on the brand and size of diapers, as well as how tightly you roll them.  Don't worry if you need more or less diapers than I used.  After making the cake, I slide out some of the diapers and replace a few of them with rolled up bibs, onsies, socks, etc.

1. Adhere Big Shot Multi-Purpose Adhesive Sheets to the bottom of a Baby Powder container and cut around it tightly.  Peel off the paper backing, and adhere the Baby Powder on the middle of the Cake Base.

2.  Roll up approximately 9 diapers.  To roll, place the diaper flat down on the table with the printed band facing up.  As pictured, I began with "top" of the diaper close to me and rolled toward the crotch of the diaper.  You could choose to do it the opposite direction as well, but you will have to be careful and the diapers get "off" more easily in this direction.  Try to roll them pretty tightly.  Wrap a smaller rubber band around the middle of the diaper.  However, you don't want to make the rubber band so tight that it puckers.  The Swaddlers have a light yellow "line" up the middle of the outside of the diaper, which makes it easy to center the rubber band which is important later.  You may want to roll all your diapers now, so that you will not have to stop and roll for each cake layer.

3.  Stand the diapers up around the Baby Powder.  It may take more or less than the 9 diapers depending on what type and size of powder and/or diapers you have.  Wrap a larger rubber band around this ring, so that it hugs the powder as shown.

4.  Roll approximately 14 more diapers.  Stand the diapers up to form a second ring around the first ring. Wrap a larger rubber band around this second ring.  Secure the entire ring with a rubber band, making sure it does not pucker them.  It will help it stand up straighter.

5. Roll approximately 20 more diapers.  Stand the diapers up to form a third ring around the second ring. Wrap a large rubber band around this third ring or tie with Baker's Twine if you do not have a large enough rubber band.  Remember that you don't want it to pucker much.  This last ring should be hitting the outer edge of the cake base or even covering it if using a 12" cake base.  Wrap with an additional rubber band or Baker's Twine for more security.  Be sure all the bands are aligned in the center of the diapers as this is your outer ring, so you want it to be neat.

6.  Adhere a bunch of Mini Glue Dots along the edge of the bottom of an inexpensive 4 oz. Baby Bottle.  Adhere the Baby Bottle to the top of the Baby Powder as pictured.

7.  Roll approximately 9 more diapers. Stand the diapers up around the Baby Powder & Baby Bottle on top of the first layer.  This will be the first ring of your second layer.  Wrap a larger rubber band around this ring, so that it hugs the powder/bottle as shown.


8.  Roll approximately 14 more diapers.  Stand the diapers up to form a second ring around the first ring of the second layer. Wrap a larger rubber band around this second ring.  Secure the entire ring with a rubber band, making sure it does not pucker them.  Again, be sure all the rubber bands are aligned in the center as this is your outer ring of the second layer.

9.  Roll approximately 7 more diapers.  Stand the diapers up around the top of the Baby Bottle on top of the second layer.  Wrap a rubber band around the last ring to form the third and top layer of the cake.  The diapers will be a little taller than the Bottle.  

10.  Add a cute topper like a stuffed animal or baby toy and decorate your "cake" as pictured at the top of the post.

LOYALTY REWARDS - When you purchase $50 or more, you qualify for my Loyalty Rewards program!  This Frequent Stamper program is my way of saying "thank you" to my returning customers in appreciation of their business.  Earn FREE stamps with MarieStamps.com!
STAMPIN' REWARDS -  Anytime you place a product order with me of $150 or more, you earn your choice of FREE Stampin' Up! products including hostess stamp sets. Check out my Stampin' Rewards page for full information on these two programs.

Sunday, September 9, 2012

BABY SHOWER SAILOR DUCKIES CARD...

Baby shower #2 was today!   I was so busy making the diaper cake for this shower (check out tomorrow's post), that I totally forgot about a card until 30 minutes before I was leaving.  Since the baby's daddy is in the Navy, I thought that the little ducky with the sailor hat stamp from the Easy Events stamp set would be perfect.  I just stamped it three times without the sentiment.


Unfortunately, the watercoloring did not go as planned and took quite a while to correct the mess as best as I could.  Between that and paper piecing (the little umbrellas), my time was up and I didn't get to do the paper piercing and other accents that I had planned for the card.  :(  Next time!

SAILOR DUCKIES BABY SHOWER CARD SUPPLIES:
  • Stamp Sets –  Easy Events (W#116958 $32.95, C#123225 $24.95), Teeny Tiny Wishes (W#115370 $36.95, C#127802 $26.95)
  • Card Stock – Marina Mist, Pool Party, Shimmery White, 2011-2013 In Color Collection Designer Series Paper Stack
  • Ink – Basic Black, Lucky Limeade Classic, Watercolor Wonder Crayons (Marina Mist, Daffodil Delight, Tangerine Tango)
  • Ribbon – Pool Party 3/8" Ruffled (#122975, $9.95)
  • Punches – Modern Label (#119849, $16.95), Word Window ($119857, $15.95), Horizontal Slot (retired)
  • Tools – Big Shot, Apothecary Accents Framelits (#127003, $24.95), Aqua Painters (#103954, $16.95), Stampin' Dimensionals (#104430, $3.95) 
LOYALTY REWARDS - When you purchase $50 or more, you qualify for my Loyalty Rewards program!  This Frequent Stamper program is my way of saying "thank you" to my returning customers in appreciation of their business and is in addition to other Stampin' Rewards.  Earn FREE stamps with MarieStamps.com!

Related Posts with Thumbnails